NAM Calibration Guide
Calibration tells the TONE3000 Plugin how hot your interface's input is, so a capture hits the model at the same level the creator used. It's optional and takes about two minutes. This guide covers it for players, plus how capture creators measure and save their levels.
In this guide
The Basics
What Calibration Does
A NAM capture learns how a piece of gear reacts to the exact signal level it was fed during training. Your audio interface converts your guitar to digital at its own level, and every interface is different. Calibration tells the TONE3000 Plugin your interface's level so the capture gets hit the same way the creator hit the real gear.
This guide is for playing captures through your own audio interface, for example with the TONE3000 Plugin in your DAW. If you run NAM on partner hardware like the Darkglass Anagram or HeadRush units, the device's input level is already known and the manufacturer handles calibration for you. Nothing to set.
It's optional. Captures sound great without it, and the block's In knob is right there if you want more or less gain. It's music: use your ears and turn knobs to taste. If you want a capture to respond exactly the way the creator set it up, read on. It takes a couple of minutes.
Why Bother?
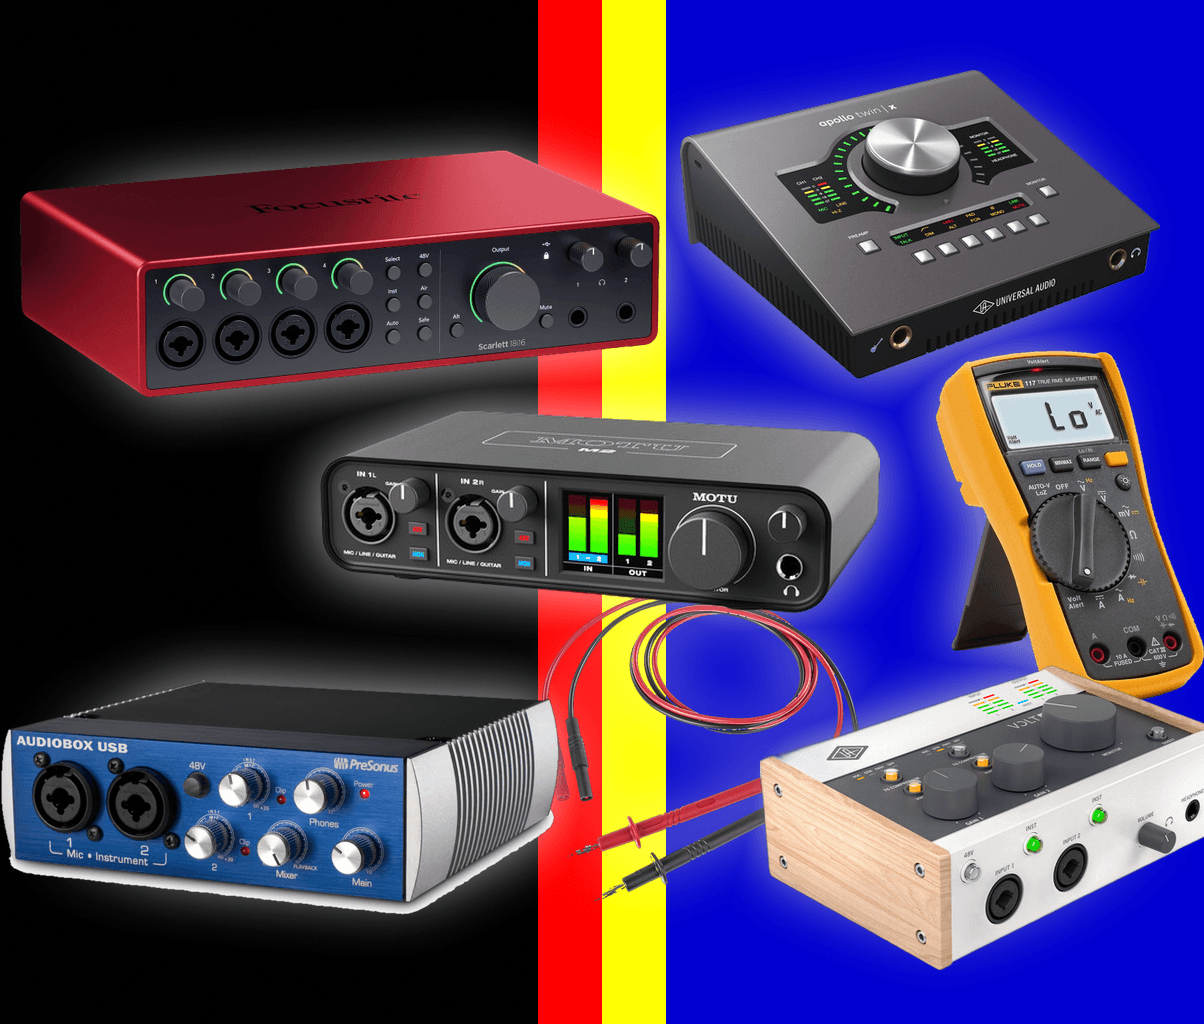
Interfaces differ by a lot. A Focusrite Scarlett's instrument input clips at +12 dBu, a MOTU M2 at +16 dBu, an Antelope Zen Go at +20 dBu. Same guitar, same gain knob at minimum, up to 8 dB difference in how hard the capture gets hit. Eight dB is roughly the gap between a vintage single coil and a hot humbucker, so without calibration the same capture can play noticeably cleaner or dirtier than the creator intended.
With Calibration on, the plugin reads the level stored in each capture, compares it to yours, and adjusts the input automatically. Set it once and every calibrated capture, from any creator, lands at the right level.
Quick Start
- Plug into the instrument input (Hi-Z / Inst / Guitar) and set the Inst switch if there is one.
- Turn the input gain all the way down. It's the only knob position the manufacturer's spec applies to.
- Find your interface's number. Check Known Levels for Popular Interfaces or your manual: the instrument input's "Maximum Input Level (at minimum gain)".
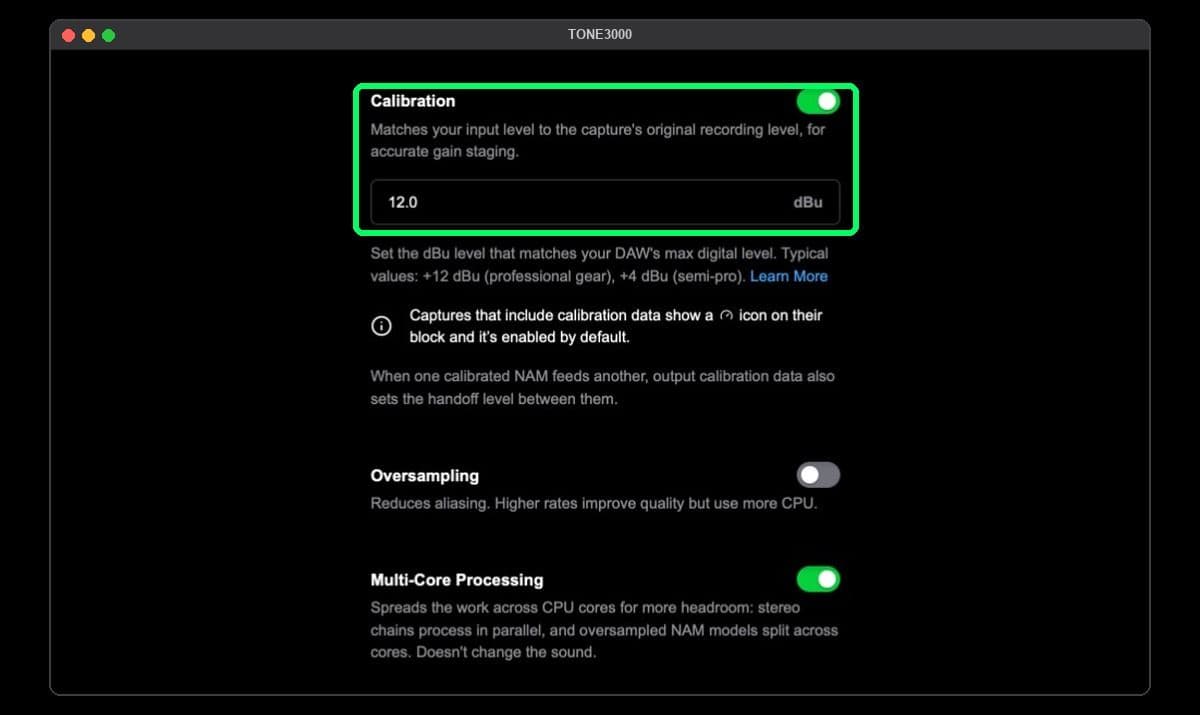
- Enter it in the plugin. Go to Settings → Plugin Settings, turn on Calibration, and type the dBu value.
- Play. Captures with calibration data show a gauge icon on their block and are compensated automatically. Use the Calibrated filter in the tone browser to find them.
Tip: Calibration is remembered on this computer, so every new plugin instance starts calibrated.
Key Terms
| Term | What it means |
|---|---|
| dBFS | Digital level. 0 dBFS is the loudest possible sample. Your DAW meters read peak dBFS. |
| dBu | Analog level. 0 dBu = 0.775 volts RMS, +12 dBu = 3.08 V, +20 dBu = 7.75 V. |
| Maximum input level | The analog level that just reaches 0 dBFS on an interface input with the gain at minimum. This is your calibration value. |
| Send level | Stored in the capture. The analog level, in dBu, that hit the gear when the creator's DAW was at 0 dBFS. |
| Return level | Stored in the capture. The analog level, in dBu, that produced 0 dBFS on the input that recorded the gear. Used for stacking captures. |
| Calibrated | The TONE3000 tag, search filter, and gauge icon for captures that carry calibration data. |
Calibrate Your Interface
Find Your Interface's Input Level
In your interface's spec sheet, find the instrument (Hi-Z / DI / Guitar) input and look for "Maximum Input Level (at minimum gain)", "Max Input Level", or wording like "Lineup: 12 dBu = 0 dBFS". That number is your calibration value.
- Use the instrument input's figure, not the mic or line input's.
- If it's quoted in dBV, add 2.2 to get dBu. +9 dBV = +11.2 dBu.
- If the input has a pad, the figure changes with it. Use the number for the pad position you play with.
Known Levels for Popular Interfaces
Instrument input with the gain at minimum, from manufacturer spec sheets unless marked (community). Specs change between revisions, so check your own manual if in doubt.
| Interface | Max input level | Notes |
|---|---|---|
| Focusrite Scarlett Solo / 2i2 / 4i4 / 8i6 / 16i16 / 18i16 / 18i20 (4th Gen) | +12 dBu | |
| Focusrite Scarlett Solo / 2i2 / 4i4 (3rd Gen) | +12.5 dBu | 18i20 3rd Gen: +9 dBu |
| Focusrite Scarlett 2i2 (2nd Gen) | +13 dBu | |
| Focusrite Clarett+ 2Pre / 4Pre / 8Pre | +15 dBu | |
| Universal Audio Apollo Twin X / Twin MkII / x4 / x8 (Hi-Z) | +12.2 dBu | |
| Universal Audio Volt 1 / 2 / 4 / 176 / 276 / 476 | +12.5 dBu | |
| Audient iD4 MkII / iD14 MkII / iD24 | +12 dBu | |
| Audient iD44 MkII | +10 dBu | |
| Audient EVO 4 / 8 / 16 | +10 dBu | |
| SSL 2 / 2+ (MkI and MkII) | +15 dBu | |
| SSL 12 | +14 dBu | |
| MOTU M2 / M4 | +16 dBu | |
| RME Babyface Pro FS (inputs 3/4) | +13 dBu | +4 dBu reference, gain 0 dB |
| PreSonus Studio 24c / 26c | +19 dBu | |
| PreSonus Revelator io24 | +10 dBu | |
| Steinberg UR22C / UR44C (Hi-Z) | +11.2 dBu | Published as +9 dBV |
| Tascam US-2x2HR | +12.2 dBu | Published as +10 dBV |
| Arturia MiniFuse 1 / 2 / 4 | +11.5 dBu | |
| Native Instruments Komplete Audio 6 MK2 | +13.2 dBu | |
| IK Multimedia AXE I/O | +14 dBu | |
| IK Multimedia AXE I/O One | +10.5 dBu | |
| Apogee Duet 3 | +14 dBu | |
| Apogee BOOM | +8 dBu | +18 dBu with the pad on |
| Antelope Zen Go / Zen Q Synergy Core | +20 dBu | |
| Zoom UAC-232 | +11.5 dBu | |
| Lewitt Connect 6 | +8.2 dBu | Published as +6 dBV |
| M-Audio AIR 192|4 / 192|6 | +6 dBu | Little headroom; hot pickups may clip |
| Behringer UMC202HD / 204HD / 404HD | -3 dBu | Pad off. Use the pad with hot pickups; its level isn't published, so measure it |
| Behringer UMC22 / UM2 | +2 dBu | Little headroom; hot pickups may clip |
| Neural DSP Quad Cortex (as USB interface) | ≈ +12.5 dBu (community) | Input level at 0 dB |
| Line 6 Helix / HX Stomp (as USB interface) | ≈ +11 dBu (community) |
Keep the Gain at Minimum
Calibration assumes the gain knob is at minimum. Every dB you add lowers your clipping level by a dB, and gain knobs aren't marked in dB, so the simplest accurate setup is to leave it at minimum. Modern instrument inputs have plenty of headroom and low noise there.
If you really need more gain, measure what you added: play any steady signal into the input at minimum gain and note the peak dBFS in your DAW. Turn the gain up to where you want it and note the new peak. The difference is the gain you added. Subtract it from your interface's number, enter that, and don't move the knob again.
Calibration Value with Added Gain
Every dB of interface gain lowers your clipping level by a dB.
Tip: If hot active pickups or a boost pedal clip the input even at minimum gain, engage the pad (and use the pad figure) or back off the guitar's volume.
No Spec? Measure It
If your interface doesn't publish a figure, you can measure it with a multimeter in about five minutes using the same method creators use. Follow Step 2 to measure one of your interface's outputs, then Step 3 with that output plugged into your instrument input. The result is your calibration value.
Set It in the TONE3000 Plugin
- Open Settings → Plugin Settings.
- Turn on Calibration and enter your interface's dBu value.
- Load any capture with the gauge icon. The plugin compensates it automatically.
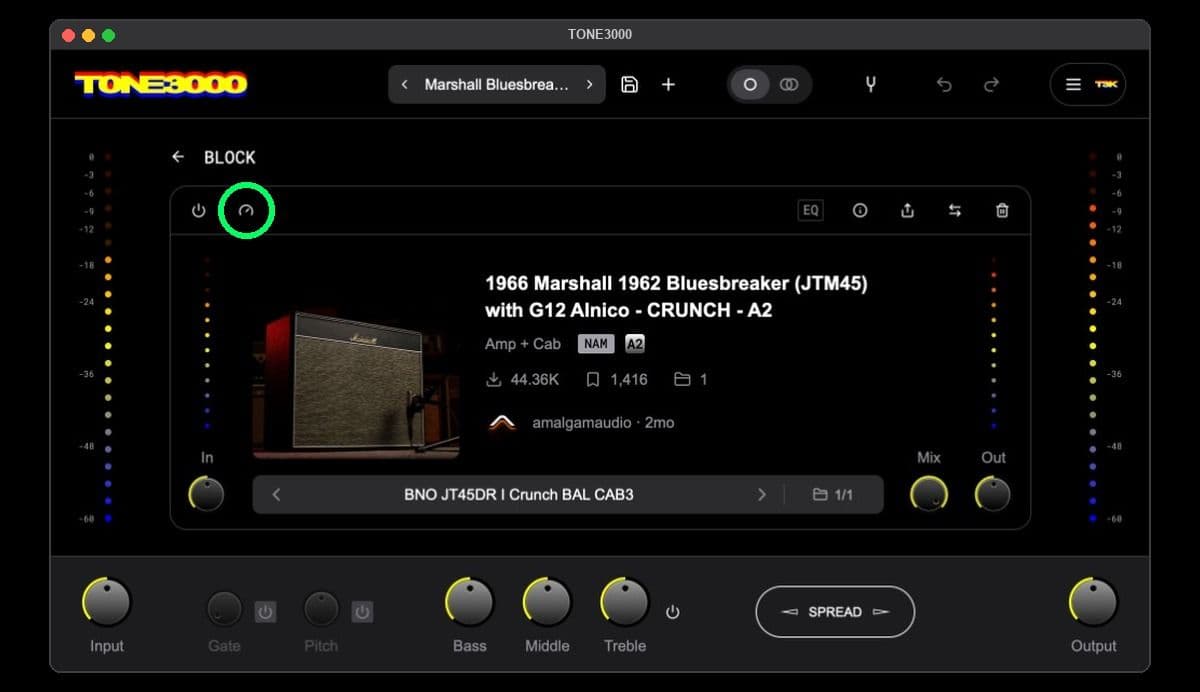
To find captures that include calibration data, open Filters in the tone browser (in the plugin or on TONE3000) and turn on Calibrated.
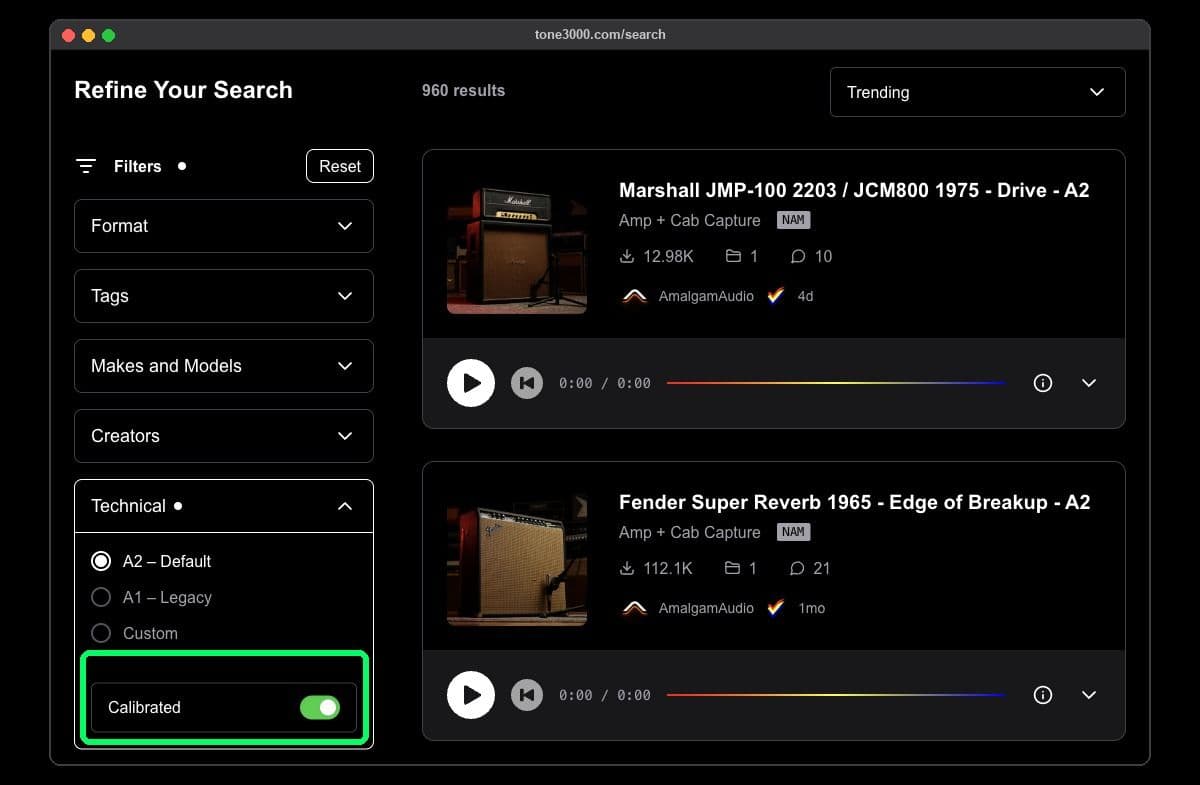
Reach for the block's In knob when you want more or less gain than the real thing. Calibration gives you the creator's starting point; the knob is still yours.
Stacking captures. When a creator also saved a return level, the plugin uses it to pass a true output level from that block to the next NAM block, so a pedal capture drives an amp capture as hard as the real pedal did. There's nothing to set up: it happens automatically with Calibration on, and Normalize may show as overridden on that block. That's intentional.
For Capture Creators
What You're Measuring
Two numbers, saved into the .nam file and shown on TONE3000 with the Calibrated tag:
- Send level (
input_level_dbu): the analog level, in dBu, that your DAW's 0 dBFS produced at the gear's input. This is the one that matters. It lets every player hit your capture at the level you did. - Return level (
output_level_dbu): the analog level, in dBu, that produced 0 dBFS at the interface input recording the gear. Optional. It lets the plugin gain-stage your capture into the next block when players stack it.
Measure the return level only for gear with a line or instrument-level output that the plugin can hand to another block: pedals, preamps, amp heads through a load box or DI, rack and outboard gear. For a mic'd amp and cab it's rarely worth it: the level reflects your mic and preamp gain rather than the amp, and it only matters if a player stacks your capture into another NAM block.
Both numbers describe your rig at the moment you recorded, so measure with exactly the levels you record with. Before or after the capture doesn't matter, as long as nothing changes in between.
What You Need
- A multimeter that reads AC volts (see below)
- A test tone. Download the 1 kHz tone or the 100 Hz tone (both 0 dBFS, loop seamlessly), drop it on a track and loop it. Or use your DAW's tone generator at 0 dBFS.
- Your normal reamp chain: interface, reamp box, and the cables you use to hit the gear you're capturing
Choosing a multimeter
Any digital multimeter with an AC volts setting works. Audio levels are a few volts and safe to probe. The one spec that matters is AC frequency range: many budget meters are only accurate from 40 to 400 Hz and read low at 1 kHz. If your meter isn't rated to 1 kHz, measure with the 100 Hz tone instead. The voltage is identical; the meter just reads it correctly. "True RMS" isn't required for a sine wave.
| Multimeter | Approx. price | Accurate at 1 kHz? | Notes |
|---|---|---|---|
| Fluke 115 / 117 | $200 to $250 | Yes | The industry standard. Overkill, but you'll never doubt the reading. |
| Fluke 101 | about $50 | Yes in practice (rated to 500 Hz) | Pocket size, no current ranges. Great for this. |
| UNI-T UT61E / UT61E+ | $60 to $80 | Yes | 22000-count resolution. Excellent value. |
| ANENG AN8008 / AN8009 | $20 to $30 | Yes | The budget pick. |
| Brymen BM235 | about $100 | No (rated to 440 Hz) | Superb meter. Use the 100 Hz tone. |
| AstroAI TRMS6000 | about $30 | No (rated to 400 Hz) | Use the 100 Hz tone. |
Prices are approximate and vary by region.
Tip: Not sure about your meter? Measure the same output with both tones. If 1 kHz reads lower than 100 Hz, use the 100 Hz reading.
Step 1: Set Your Levels and Leave Them
Set up your reamp chain as usual: interface output → reamp box → gear → load box, DI, or mic → interface input.
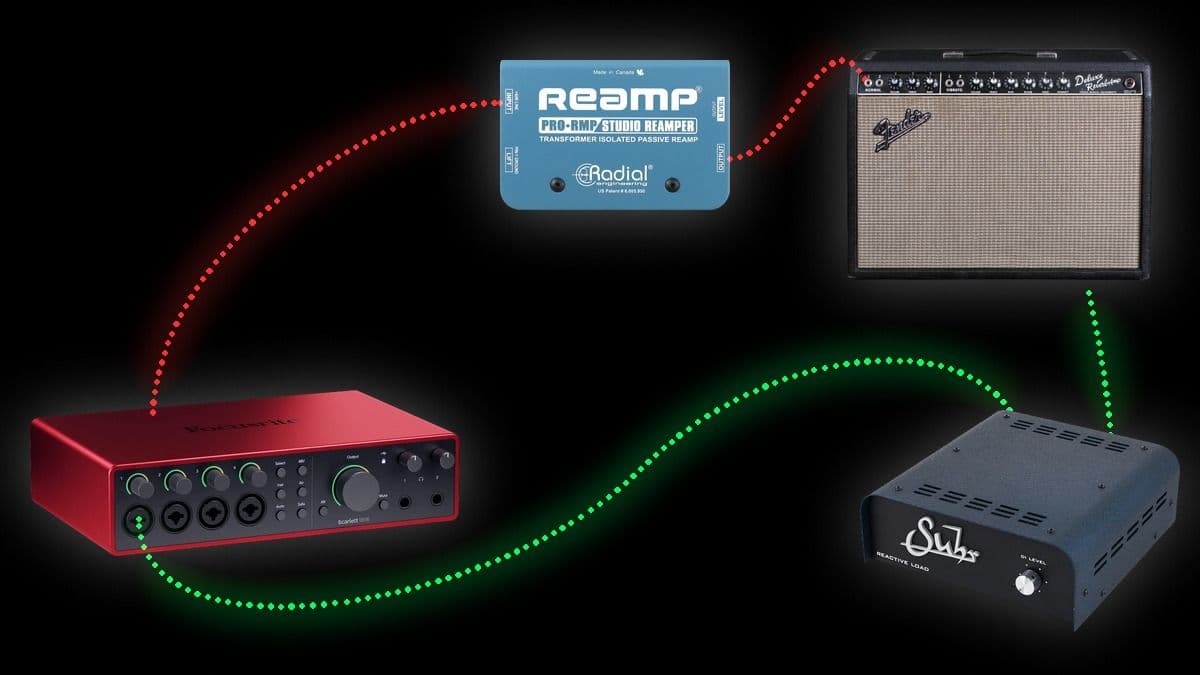
Pro tip: hit the gear hot. A capture only learns the levels it's fed, and calibration tells the plugin how hot you went, so there's no downside. Passive reamp box: trim all the way up. Active reamp box: as hot as it goes without clipping the box; the gear itself is allowed to clip. Reference: a hot humbucker peaks around 2 V (+5 dBu), an EMG 81 about 4.5 V (+12 dBu). Aim there or higher.
Set the return gain so the recording peaks comfortably below 0 dBFS, and from here on don't touch any hardware level. If you do, re-measure.
Step 2: Measure the Send Level
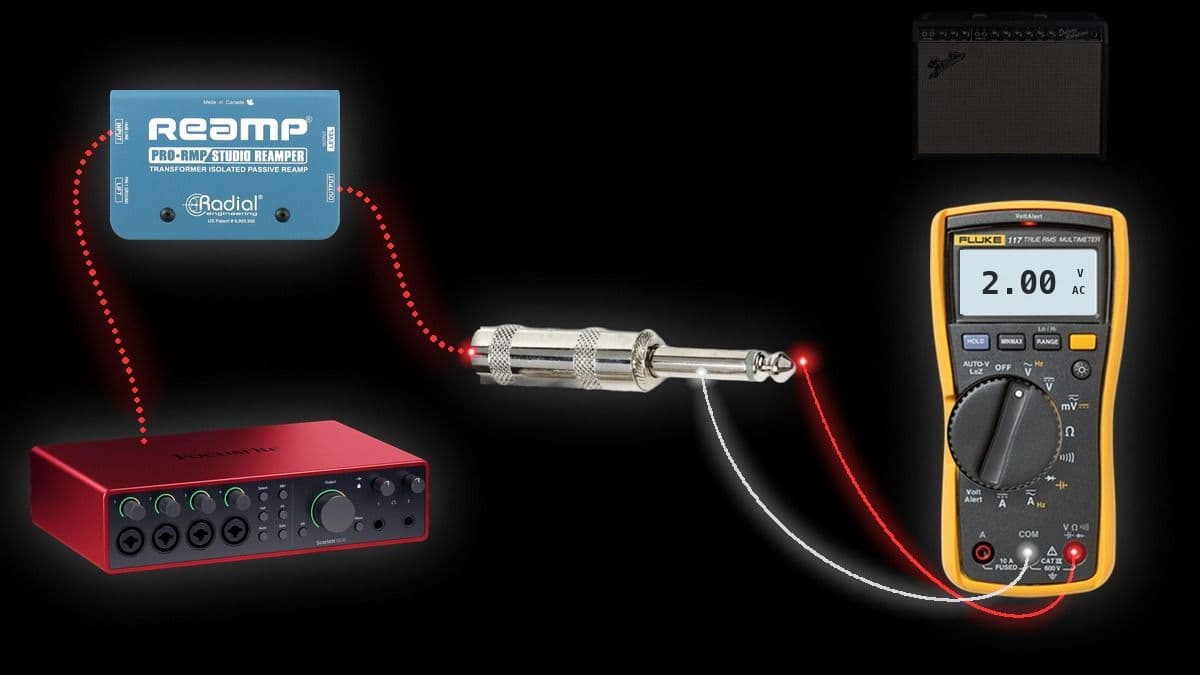
- Loop the 1 kHz tone at 0 dBFS on a track routed to the output you reamp from. Track and master faders at 0 dB, no limiter.
- Unplug the cable from the gear's input (the end that goes into the amp or pedal, after the reamp box if you use one).
- Set the meter to AC volts (V~, not mV). Touch the red probe to the tip of the plug and the black probe to the long sleeve, and let the reading settle. Alligator-clip leads make this easier.
- Convert volts to dBu with the calculator below. That's your send level.
Volts ↔ dBu
Type in either box. Volts are RMS, as read on a multimeter's AC setting.
Note: Expect 1 to 10 V (+2 to +22 dBu). Millivolts means the tone isn't at 0 dBFS, the output is turned down, or the meter is on mV. Zero means you're not touching tip and sleeve.
Step 3: Measure the Return Level (Optional)
Only for DI captures: pedals, preamps, amp heads through a load box or DI, rack and outboard gear, where the gear's output goes straight into your interface. For a mic'd amp and cab it's rarely worth it: the level reflects your mic and preamp gain rather than the amp, and it only matters if a player stacks your capture into another NAM block, such as an outboard compressor capture.
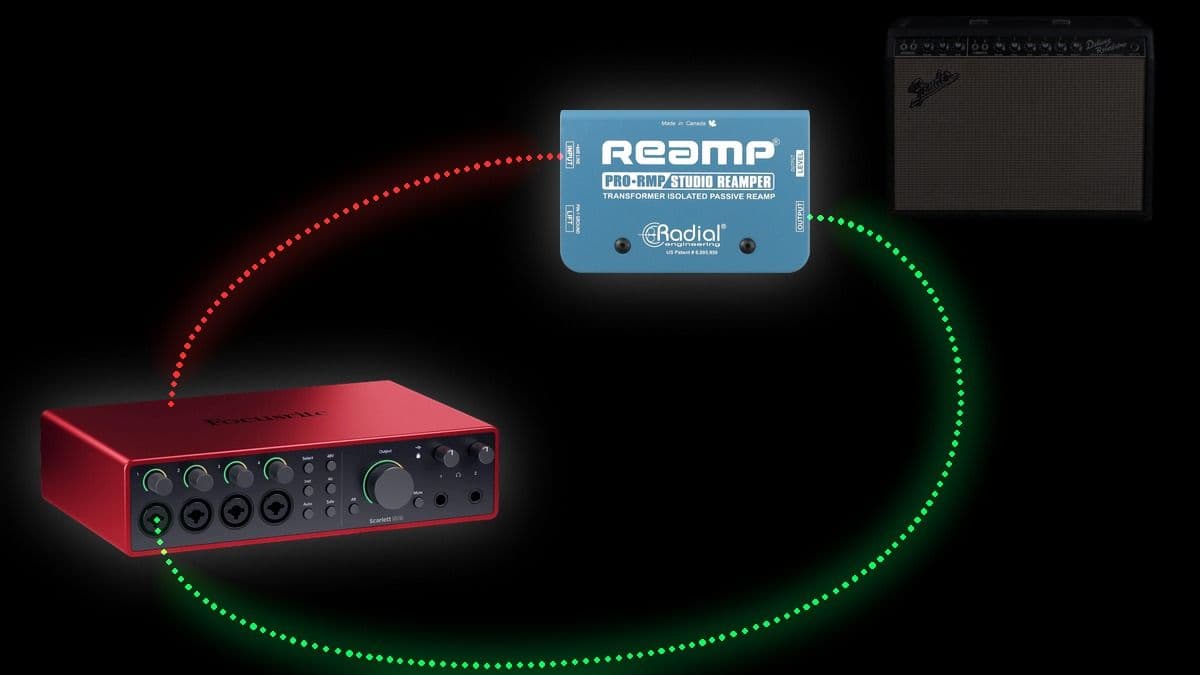
- Plug the output you just measured straight into the interface input that records the gear, bypassing the gear. Don't touch any gain knob.
- Play the tone. It will probably clip the input. Lower the tone track's fader until the input peaks just under 0 dBFS. Note how far you lowered it and the input's peak reading.
- Enter the three numbers below.
Return Level
Plug the measured send straight into the return input, lower the tone until the input stops clipping, and enter what you see.
Shortcut: If the return input's gain is at minimum, use its maximum input level from the spec sheet instead of measuring: the line input figure if you record into a line input, or the instrument figure from the interface table if you record into an instrument input.
Step 4: Enter the Values on TONE3000
When you capture your gear, open Advanced under Training Settings.
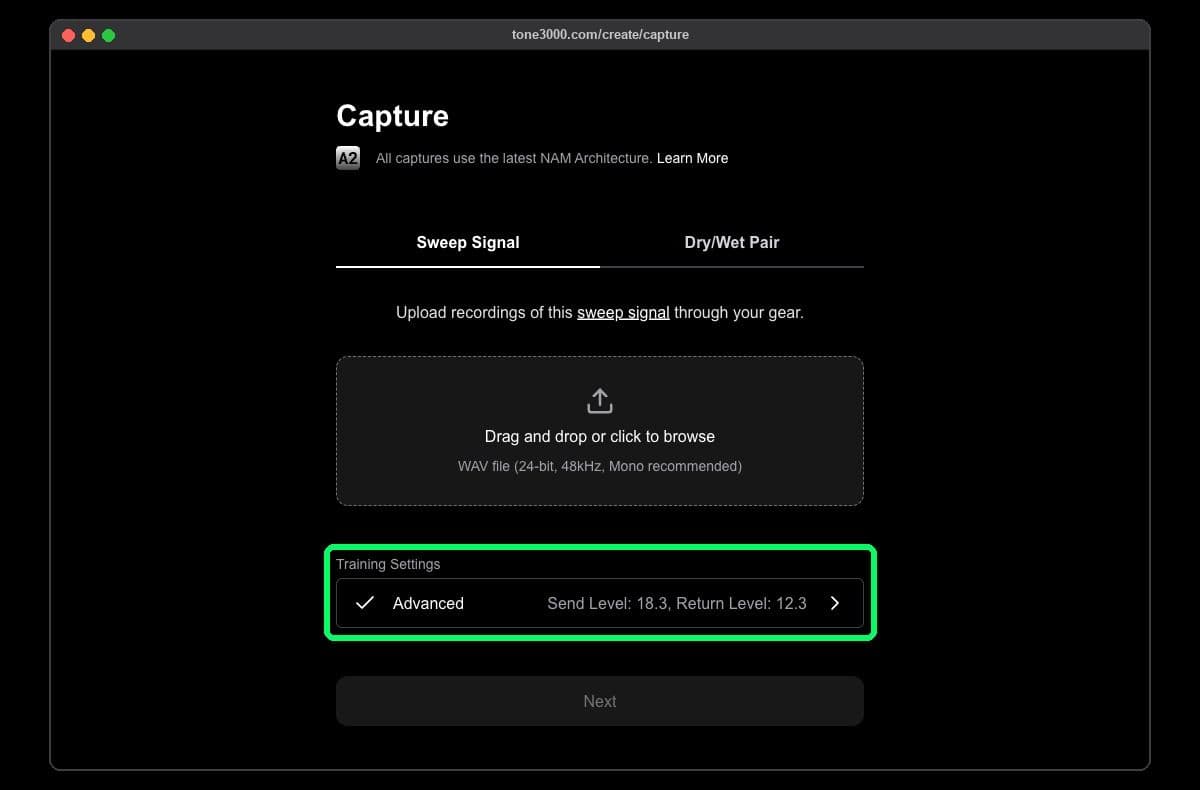
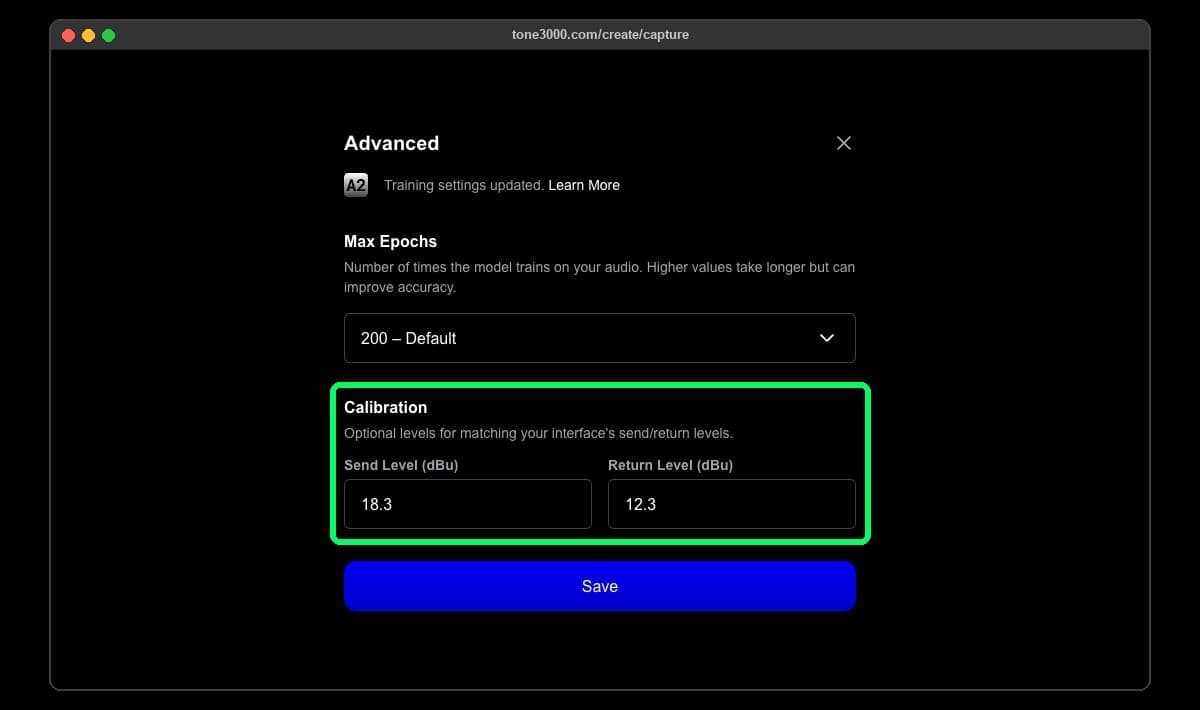
Enter Send Level (dBu) and Return Level (dBu) under Calibration and save. TONE3000 writes them into the .nam file and tags your tone Calibrated.
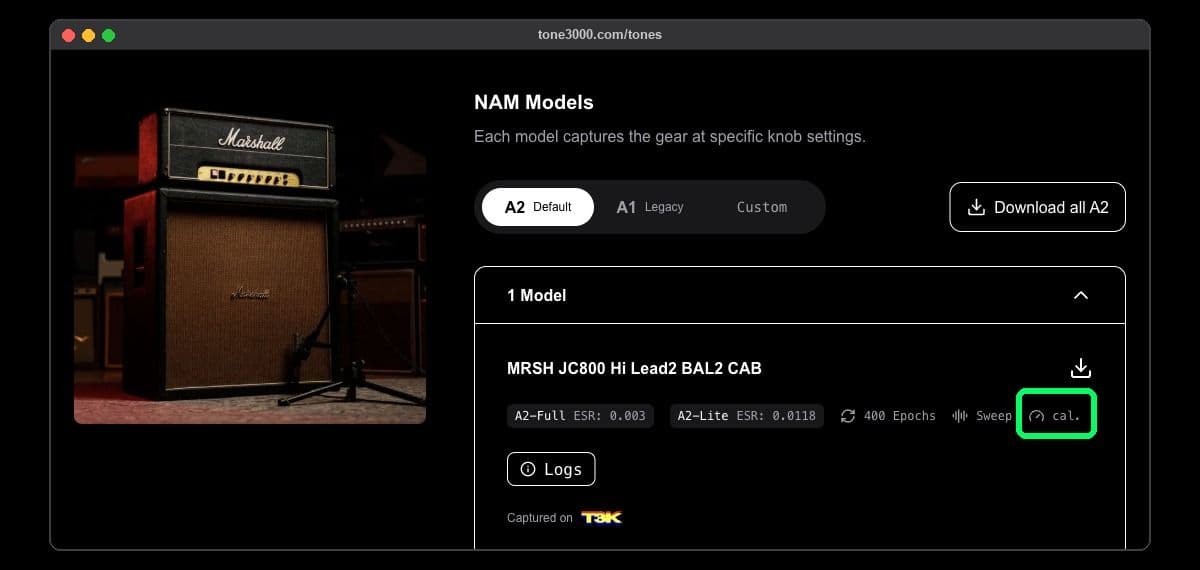
Already uploaded? Open the tone, open the model's menu, expand Calibration, and enter the levels. TONE3000 updates the stored .nam file for you. Either way, the model shows a gauge icon and a cal. label on its tone page.
Creator Checklist
- Levels set, then hands off the hardware
- 1 kHz (or 100 Hz) tone at 0 dBFS, cable unplugged from the gear, meter on AC volts, tip to sleeve
- Volts to dBu = send level
- Loop send into return and calculate the return level (pedals, preamps, DI'd heads, outboard only)
- Enter both under Advanced → Calibration on TONE3000
Reference
Calculators
The three calculators from this guide in one place.
Volts ↔ dBu
Type in either box. Volts are RMS, as read on a multimeter's AC setting.
Calibration Value with Added Gain
Every dB of interface gain lowers your clipping level by a dB.
Return Level
Plug the measured send straight into the return input, lower the tone until the input stops clipping, and enter what you see.
Volts to dBu Conversion
dBu = 20 × log10(V ÷ 0.775). Going the other way, V = 0.775 × 10^(dBu ÷ 20). If a spec is in dBV, add 2.2 to get dBu.
| V RMS | dBu | V RMS | dBu |
|---|---|---|---|
| 0.775 | 0 | 3.88 | 14 |
| 0.975 | 2 | 4.36 | 15 |
| 1.23 | 4 | 4.89 | 16 |
| 1.55 | 6 | 5.48 | 17 |
| 1.95 | 8 | 6.15 | 18 |
| 2.45 | 10 | 6.90 | 19 |
| 2.75 | 11 | 7.75 | 20 |
| 3.08 | 12 | 8.69 | 21 |
| 3.27 | 12.5 | 9.75 | 22 |
| 3.46 | 13 | 12.3 | 24 |
FAQ
Learn More
Related Guides
- TONE3000 Plugin, including the Calibration and Gain Staging settings
- Neural Amp Modeler, the basics of NAM captures
- Capture Your Gear: Sweep Method and Dry/Wet Method
Need Help?
Join the TONE3000 Discord, the Neural Amp Modeler Facebook Group, or the Neural Amp Modeler subreddit. Chances are someone has measured your exact interface.
For anything else, email support@tone3000.com.
Thanks for being a part of the TONE3000 community.
Related Guides
Trending NAM Tones




NEW TO TONE3000?
Discover hyper-realistic digital models of iconic gear, including the Fender Twin Reverb, Vox AC30, Marshall JCM 800, and thousands more. Getting started is easy—and free!