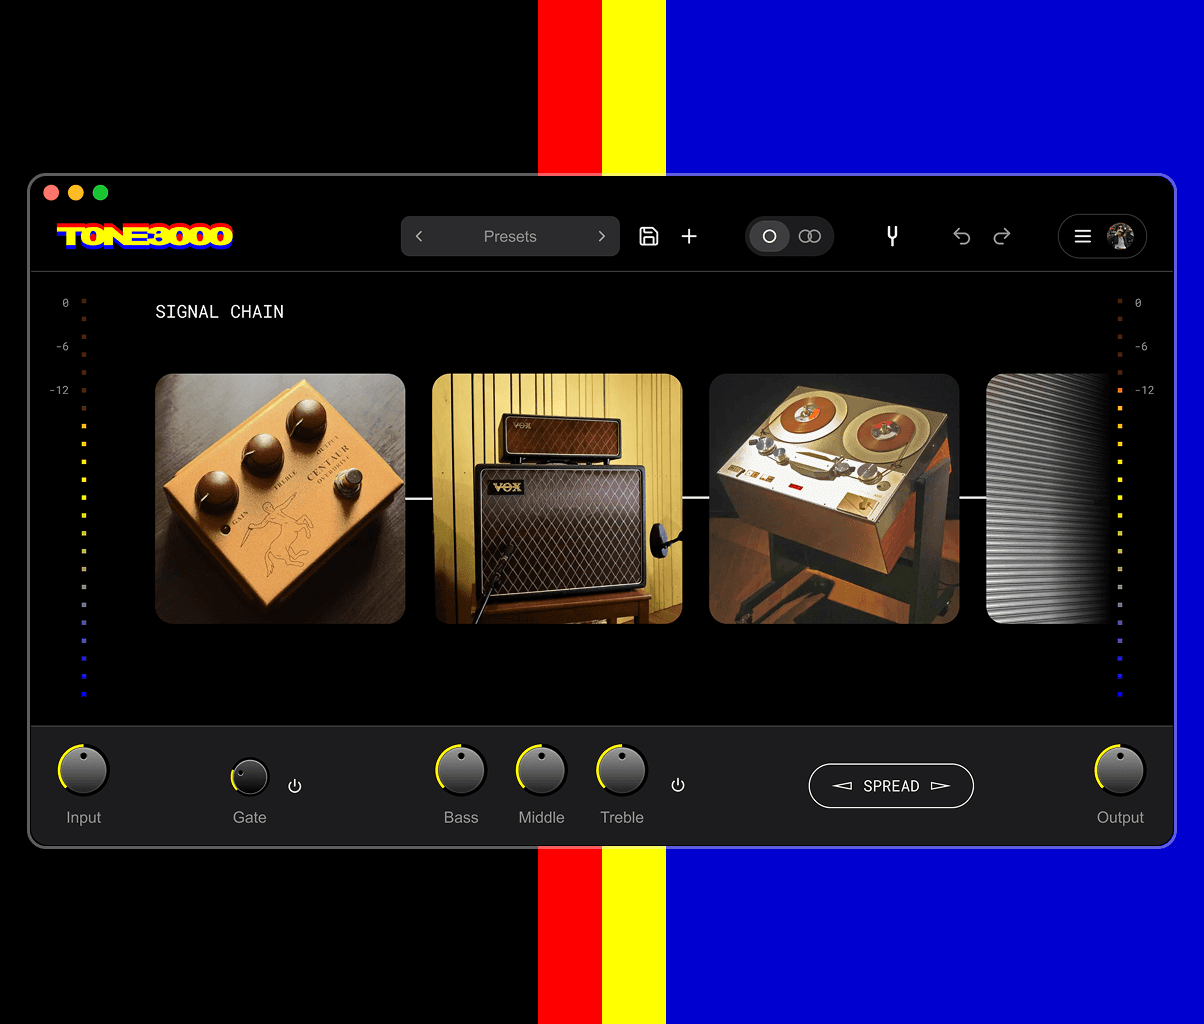
TONE3000 Plugin Guide
The TONE3000 Plugin is free and easy to use. This beginner-friendly guide gets you plugged in and playing NAM captures in minutes, then dives into advanced features for pros.
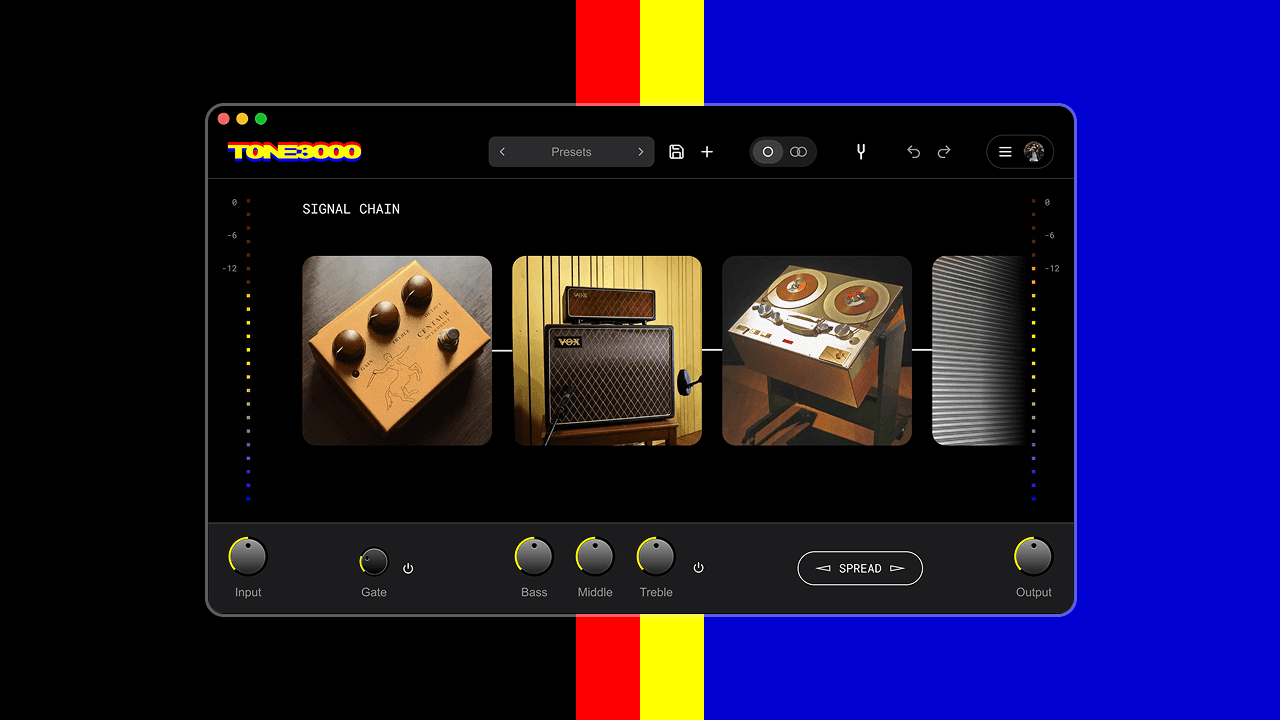
In this guide
The Basics
Overview
The free, official TONE3000 Plugin and standalone app lets you play through a massive, constantly expanding library of Neural Amp Modeler (NAM) captures and impulse responses (IRs) created by the TONE3000 community. It works in every major DAW, or you can use the standalone app with no DAW required.
You can browse and load tones directly inside the plugin without downloading and managing files locally, though the plugin also supports loading local files and offline use.
Quick Start
To use the TONE3000 Plugin you need:
- A guitar or bass and a 1/4" instrument cable
- An audio interface
- Headphones or monitors
- An internet connection to load new tones (everything else works offline)
- Optional: a DAW, since the plugin also runs as a standalone app
Steps to play:
- Download and install the plugin. Get the installer at tone3000.com/plugin/download and run it.
- Connect your gear. Plug into a Hi-Z / instrument input (Line/Inst switch set to Inst), connect the interface over USB, and plug in your headphones or monitors.
- Set your input level. Turn up the interface gain while playing your hardest. Aim for a healthy signal that never lights the red clip indicator.
- Open it. In a DAW, insert TONE3000 on an instrument track and arm it. In the standalone app, pick your devices in Settings → System Settings and turn on Hear Yourself.
- Sign in. Create a free account in the plugin. You can browse Trending signed out, but loading a tone requires an account.
- Load a tone. Click + (Add Tone) and grab an Amp + Cab from Trending; it's complete out of the box.
- Play and record. Works like any other amp plugin. Arm the track, hit record, play.
Latency tip: If you hear a delay between playing a note and hearing it, lower your buffer size to 128 samples. In standalone, that's Settings → System Settings → Buffer Size. In a DAW, it's in your host's audio preferences. If 128 introduces crackles or pops, step back up to 256.
Monitoring tip: Use headphones if speakers are anywhere near your pickups. High-gain tones can feed back loudly and fast.
Performance tip: The plugin runs at any sample rate but is lightest at 48 kHz. Other rates resample, which costs CPU.
Note: The TONE3000 Plugin runs NAM A2 captures (A2-Full and A2-Lite) and impulse responses (IR's). Files from the legacy NAM architecture (A1) can't be loaded.
Installation
Download TONE3000 for your platform: tone3000.com/plugin/download
| Platform | Installer |
|---|---|
| macOS | .pkg (universal) |
| Windows | .exe (x64) |
| Linux | .tar.gz with install.sh (x64 or ARM64) |
macOS
Open the .pkg, follow the prompts, and choose the formats you want (Standalone, VST3, AU, CLAP, AAX). When it's done, open TONE3000 from Applications or load it in your DAW.
If your DAW was open during install, rescan plug-ins or restart it.
Windows
Run the setup .exe and follow the prompts. Choose Full to install everything, or Custom to pick from Standalone, VST3, AAX, CLAP, and factory presets.
Use an ASIO driver with your interface for the lowest latency.
Linux
Extract the archive and run ./install.sh. This installs VST3, LV2, and CLAP plus the standalone app with a desktop entry.
The installer checks for the few system libraries the plugin uses (GTK3, ALSA, fontconfig, X11, and libcurl), which ship with every mainstream desktop distribution. To check without installing, run ./install.sh --check.
Format support
| Format | Works in |
|---|---|
| Standalone | No DAW required |
| VST3 | Ableton Live, Reaper, Bitwig Studio, FL Studio, Studio One, Cubase/Nuendo, Ardour |
| AU (macOS only) | Logic Pro, GarageBand |
| CLAP | Reaper, Bitwig Studio |
| AAX | Pro Tools |
| LV2 | Linux hosts, including Ardour and Mixbus |
Updating the Plugin
The plugin doesn't update itself. To get a new version, you install it again over your current one.
- Download the latest version at tone3000.com/plugin/download.
- Run the installer and follow the prompts, just like your first install.
- Open the TONE3000 plugin in your DAW or as the standalone app.
Your presets are preserved, so everything you've saved is right where you left it.
To see which version you're running, go to Settings → Plugin Settings. When a newer version is available, you'll see an update button there.
Tip: If your DAW was open while you ran the installer, restart it or rescan plug-ins so it loads the new version.
Opening the Plugin
There are two ways to run TONE3000: as a standalone app with no DAW, or as a plugin in your DAW.
Standalone app
- Open TONE3000 from Applications (Mac), the Start menu (Windows), or your apps menu (Linux).
- Go to Settings → System Settings and choose your input and output devices. Allow microphone/input access if your OS asks.
- Turn on Hear Yourself to monitor through the plugin.
- If you hear latency while playing, set Buffer Size to 128 samples. On Windows, use an ASIO driver as well.
Use headphones when monitoring with speakers nearby. Feedback gets loud fast.
In your DAW
Create or select a track, insert TONE3000 as an effect, then route your interface input to the track and arm it. In a DAW the host controls audio devices and sample rate, so you'll set those in your DAW preferences rather than inside TONE3000.
If TONE3000 doesn't appear in your plugin list, rescan plug-ins or restart the DAW.
Where to find it:
| DAW | How to insert |
|---|---|
| Ableton Live | Select the track, open the Plug-in Device Browser (third icon on the left), then double-click or drag TONE3000 onto the track. |
| Cubase | Open an empty insert slot in the Mixer and select EQ → TONE3000. For MIDI control, add a MIDI track and route its output to the TONE3000 instance. |
| FL Studio | Open the Mixer, click an empty insert slot, and choose TONE3000 from the VST/VST3 list. |
| GarageBand | Select the track, click an empty slot in Smart Controls or the Mixer, and choose TONE3000 from the Audio Units menu. |
| Logic Pro | Select an unused insert and choose Audio Units → TONE3000. |
| Pro Tools | Select an unused insert and pick TONE3000 from the EQ section of the plug-in menu. |
| Reaper | Click the track's FX button, then search for TONE3000. |
| Studio One | Click the + beside the Inserts tab and choose TONE3000. |
Sign in
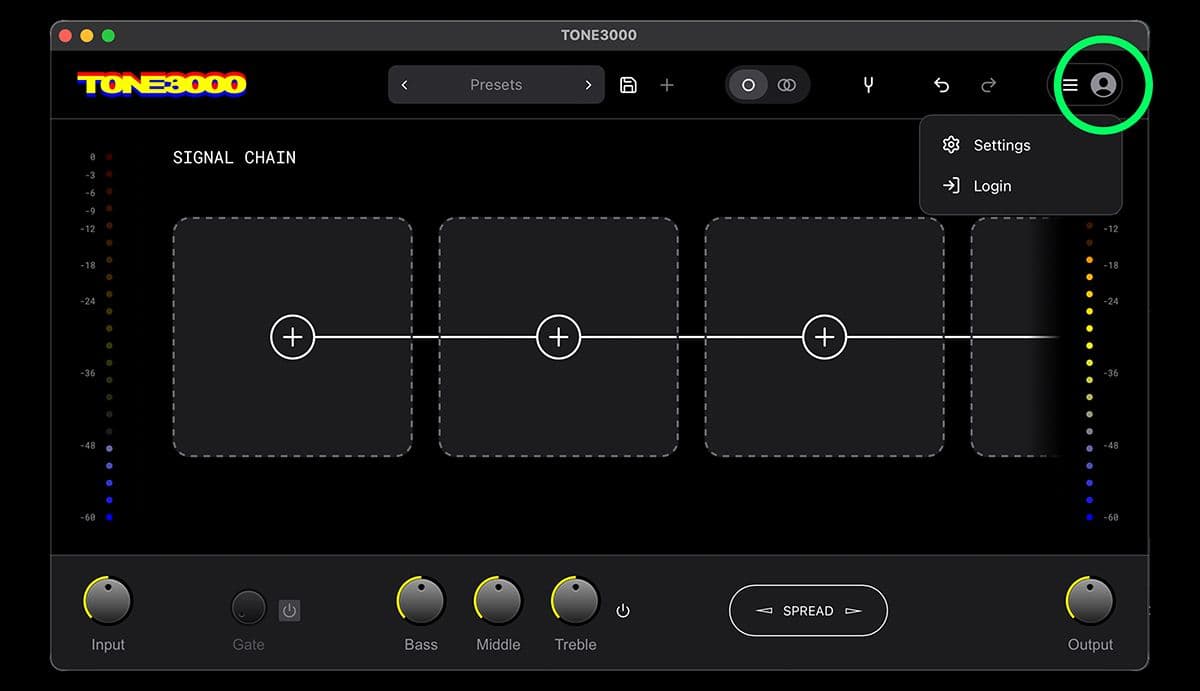
Click the account menu or any Sign in prompt in the tone browser. The plugin opens your web browser so you can sign in or create a free account, then you return to the plugin. If your browser doesn't open, click Copy Link and paste the link into any browser on the same computer. To sign in from your phone instead, choose Sign in on a different device and scan the QR code or enter the code shown.
Trending tones are browsable while signed out, but loading a tone from TONE3000 requires an account so the plugin can download the model securely. Once you sign in, every TONE3000 instance on your computer, in any DAW or the standalone app, stays signed in.
Browse the library
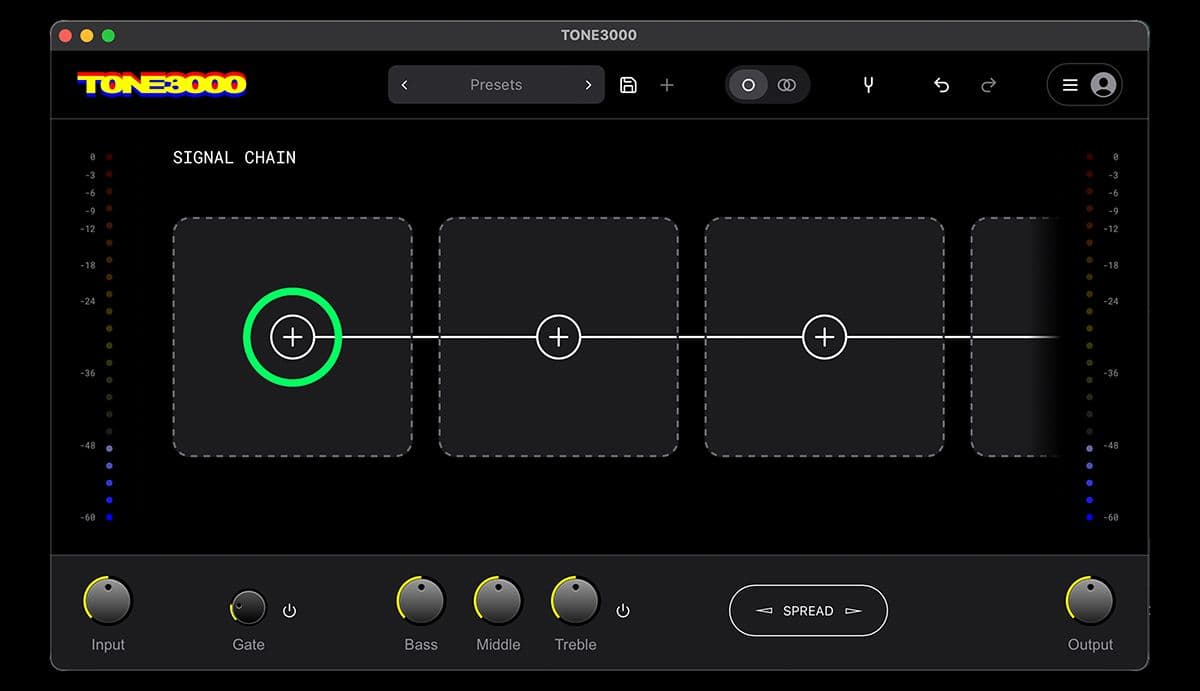
Click the + (Add Tone) tile in the chain to open Select Tone and search the full TONE3000 library right inside the plugin. Signed out, you'll see the top trending tones for each gear type.
- Search finds tones by title, gear, tags, or creator.
- Gear narrows results by type: Amp + Cab, Amp Head, Cabinet, Pedal, Outboard, Spaces, or Experimental.
- Verified shows only tones from verified creators: brands, artists, and top creators.
- Profile shows your own tones: Recently used, Favorites (tones you've favorited on TONE3000), or Created (tones you've trained or uploaded).
- Filters adds sorting (Best match, Trending, Popular, Newest, Oldest) and narrows by Format (NAM or IR), Tags, Makes, Creators, or Calibrated.
Active filters appear as chips above the results. Click a chip's name to change it, or × to clear it.
Load a tone
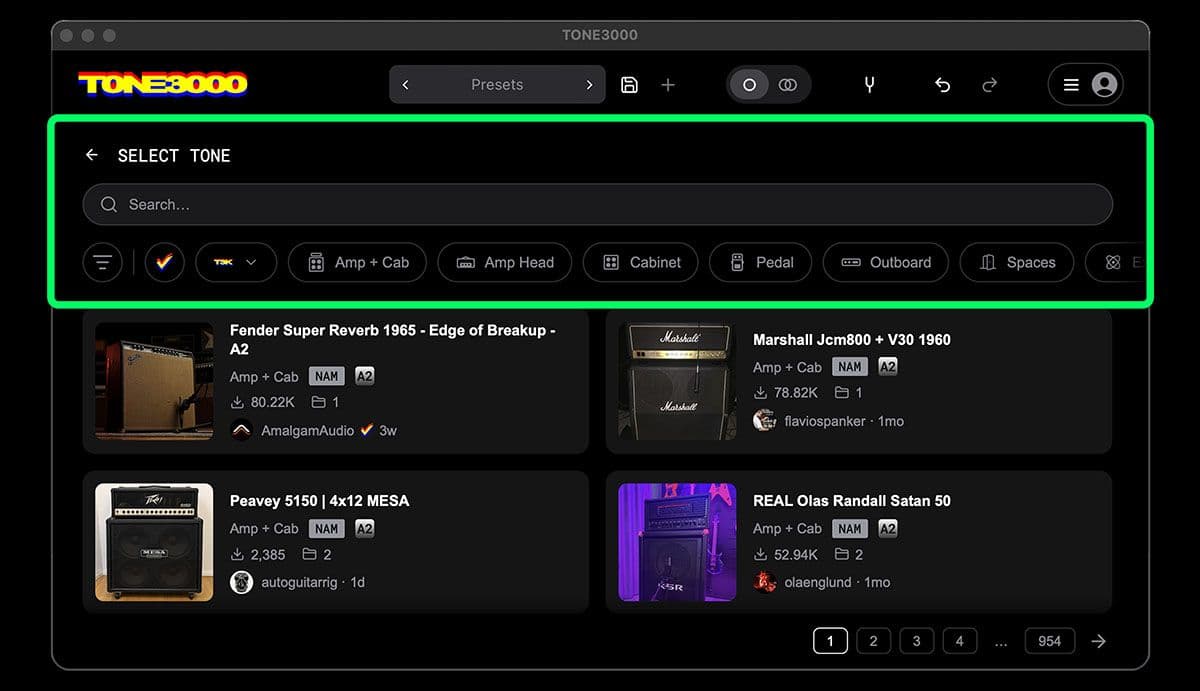
Click a tone, pick a model if the pack contains several (each is a different knob snapshot), and it downloads as a block in your chain. Set Input and Output on the faceplate and play.
You can add, remove, swap, and rearrange blocks at any time from the main screen.
Import your own files
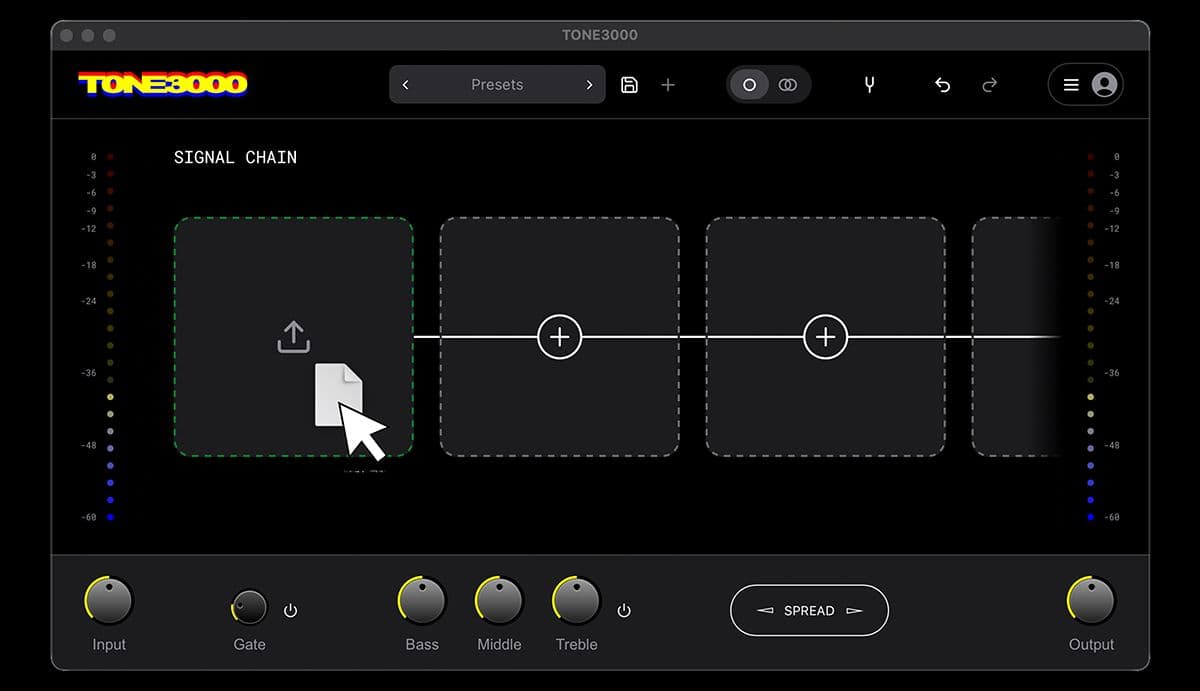
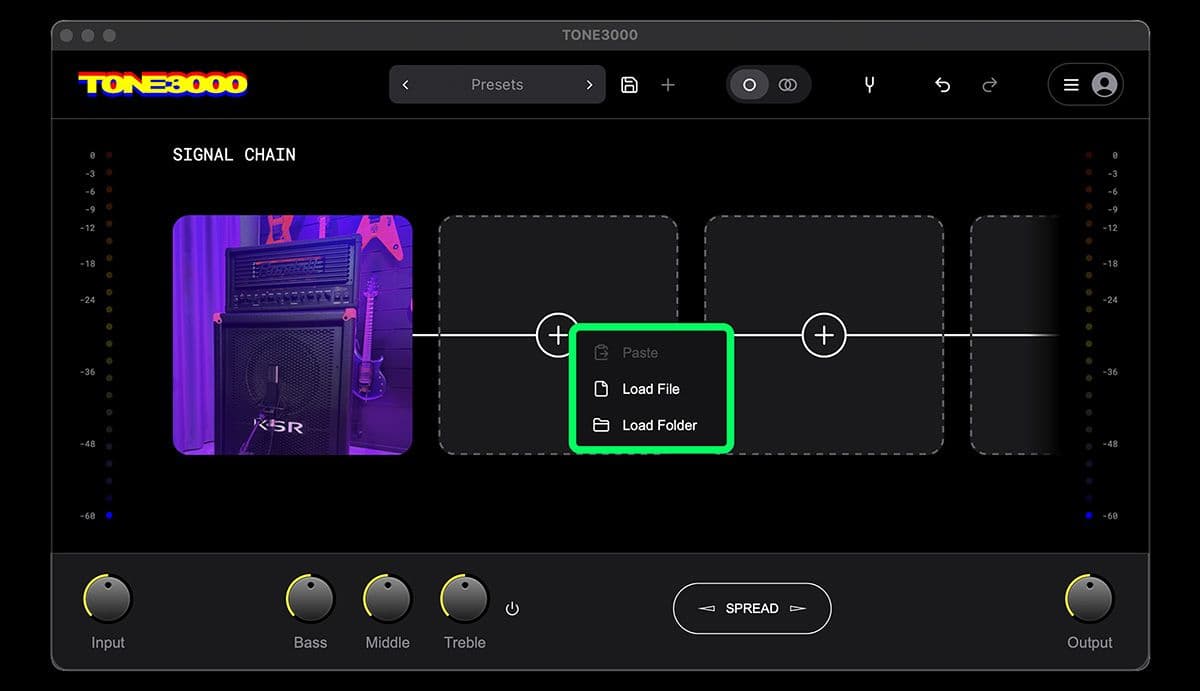
Already have NAM files or IRs on your computer? Right-click any tile (or touch and hold on a touchscreen) and choose Load File or Load Folder. You can also drag and drop files or folders onto the chain. No TONE3000 account is required.
You can import individual models or an entire folder. A folder loads as one tone named after the folder, with one model per file (nested folders included, up to 300 models, 50 MB each). The plugin reads .nam files (A2) and IR .wav files; a mixed folder uses whichever type is in the majority. Local imports work signed out and fully offline, including switching between their models.
When the plugin can tell what a local model is (amp, amp + cab, pedal, cabinet, and so on), its tile shows the matching gear icon, so your chain is easy to read at a glance.
Pairing an Amp Head with a Cabinet
Amp Heads need a cab to sound right. Keep the Amp Head as the first NAM block, click + again, and add a Cabinet IR. That's a custom amp and cab combination.
Learn More: What Is an Impulse Response?
Building a chain
| Block type | What it is | Where it goes |
|---|---|---|
| Amp + Cab | Amp + speaker cabinet together | Best starting point, ready to play on its own |
| Amp Head | Amplifier only | Pair with a Cabinet IR for a complete tone |
| Cabinet | Speaker cabinet (usually an IR) | Right after an Amp Head |
| Pedal | Overdrive, distortion, fuzz, etc. | Before the amp, like a real pedalboard |
| Outboard | Compressors, EQs, studio gear | Later in the chain, after the mics |
| Spaces | Rooms, reverbs, delays (IRs) | At the end, as an overall effect |
Beginner tip: Load an Amp + Cab, nudge Bass/Middle/Treble, save a preset. You're done.
Pro tip: Build pedals → Amp Head → Cabinet → Space, EQ each block, and keep Normalize on so levels stay consistent when you swap models.
Note: If your mouse or trackpad doesn't support left/right scrolling, use the left and right arrow keys to scroll the chain. On a touchscreen, a quick sideways swipe on a tile scrolls it.
Offline Use
The plugin works offline. Anything that processes audio runs without an internet connection: your chains, presets, downloaded models, NAM captures, and IR's, even undo/redo. Files you import from your computer work offline too, including newly added local models.
The only thing that needs a connection is loading new tones or models from TONE3000.
Dial In Your Sound
Shaping Your Sound
Hover over any control and the info bar under the faceplate shows a one-line tip.
Master controls
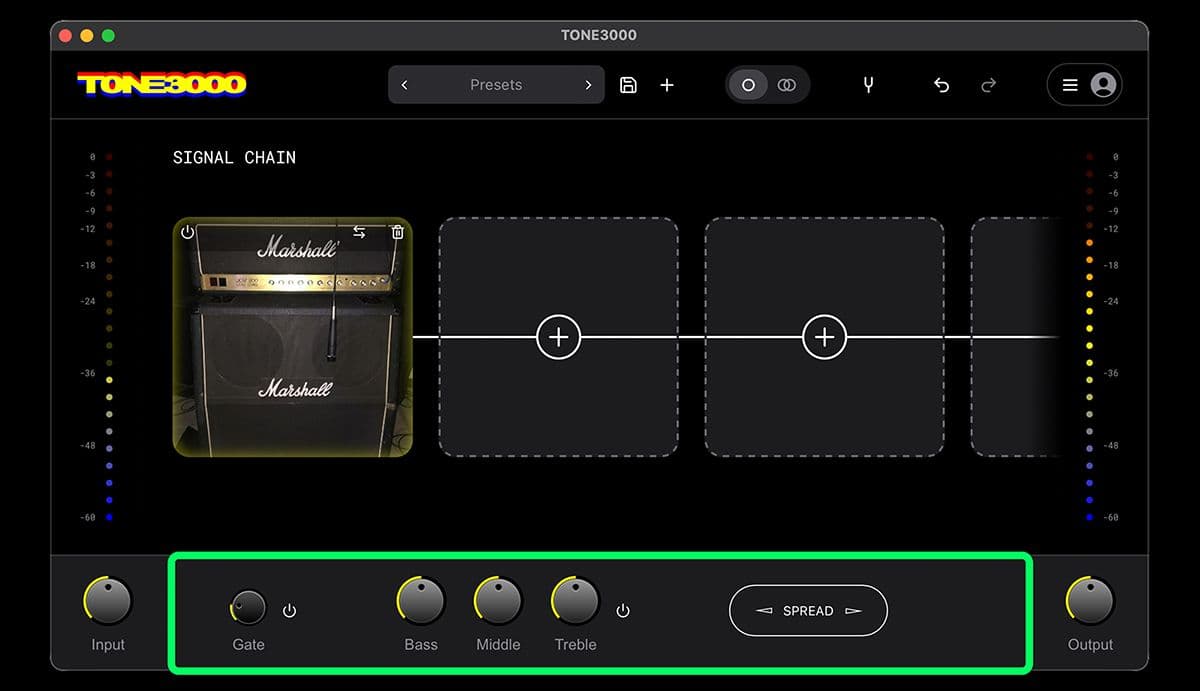
These sit at the bottom of the window and affect your entire sound.
- Noise Gate cuts signal below the threshold, which cleans up hum and hiss on noisy, overdriven tones. Right-click the Gate knob for advanced controls. See Noise Gate below.
- Pitch Shift transposes your instrument up or down without retuning, or sweeps it like a whammy pedal. It's hidden by default: turn on Show Pitch Shift in Settings → Plugin Settings. See Pitch Shift below.
- EQ boosts or cuts bass, mids, and treble across the whole tone.
- Spread widens the stereo image in Mono mode. The Offset control sets the delay between the left and right signals, which changes perceived width. See Stereo, Spread, and Align.
Noise Gate
The gate sits at the start of the chain, before your first block. It's internally side-chained to a filtered copy of your input (roughly 80 Hz to 5 kHz), so hum can't hold it open and hiss won't trigger it. It opens instantly on pick attacks with no added latency and closes as a smooth downward expander, so note tails fade instead of cutting off.
Turn the Gate knob to set the threshold. Right-click it (or touch and hold on a touchscreen) to open the advanced controls:
- Release sets how fast the gate closes, from 5 to 500 ms (default 50 ms). Short is tight; long gives natural tails.
- Hold keeps the gate open for a moment after the signal drops, from 0 to 200 ms (default 20 ms), so palm mutes and staccato playing don't flutter.
- Range sets how deep the gate closes, from 20 to 80 dB (default 80 dB). 80 dB is fully muted; lower values just tame the noise.
High-gain tip: For tight rhythm parts, raise the threshold until the noise between notes disappears, then shorten Release so the gate snaps shut.
Pitch Shift / Transpose
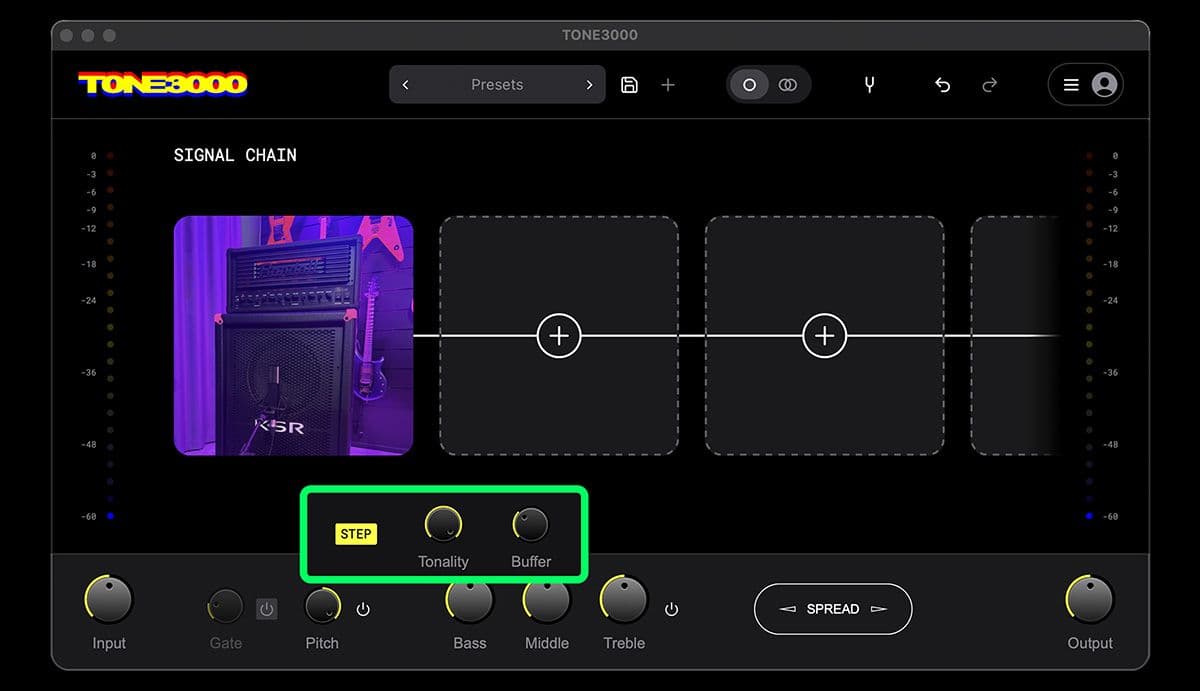
Pitch Shift transposes your instrument up to 24 semitones (two octaves) in either direction. It sits at the start of the chain, right after the gate, so your amps and pedals hear the shifted instrument, just like playing a down-tuned guitar. It handles chords and low bass notes cleanly.
Pitch Shift is hidden by default, so you won't see it on the faceplate until you turn it on. Go to Settings → Plugin Settings and turn on Show Pitch Shift. Then power it on from the faceplate and turn the Pitch knob. Right-click the knob (or touch and hold) for the advanced controls:
- STEP (on by default) snaps the shift to whole semitones for transposing. Turn it off for a smooth sweep, like a whammy pedal.
- Tonality leaves the highs above its frequency unshifted (1 to 20 kHz), which keeps pick attack bright. It's off by default for a pure shift.
- Buffer sets the shifter's delay buffer: 20, 30 (default), 40, or 60 ms. Shorter means less latency; longer sounds cleaner. Use 30 ms or more for bass, since 20 ms can't hold a low bass note.
Pitch Shift adds a little latency while it's on and none when it's off. Pick attacks still arrive within a few milliseconds, so it stays tight for live playing.
Whammy tip: Turn STEP off, then map Pitch to a MIDI expression pedal in Settings → Plugin Settings → MIDI Mapping. Load the Mesa Pitch Shift factory preset to hear it in action.
Per-block controls
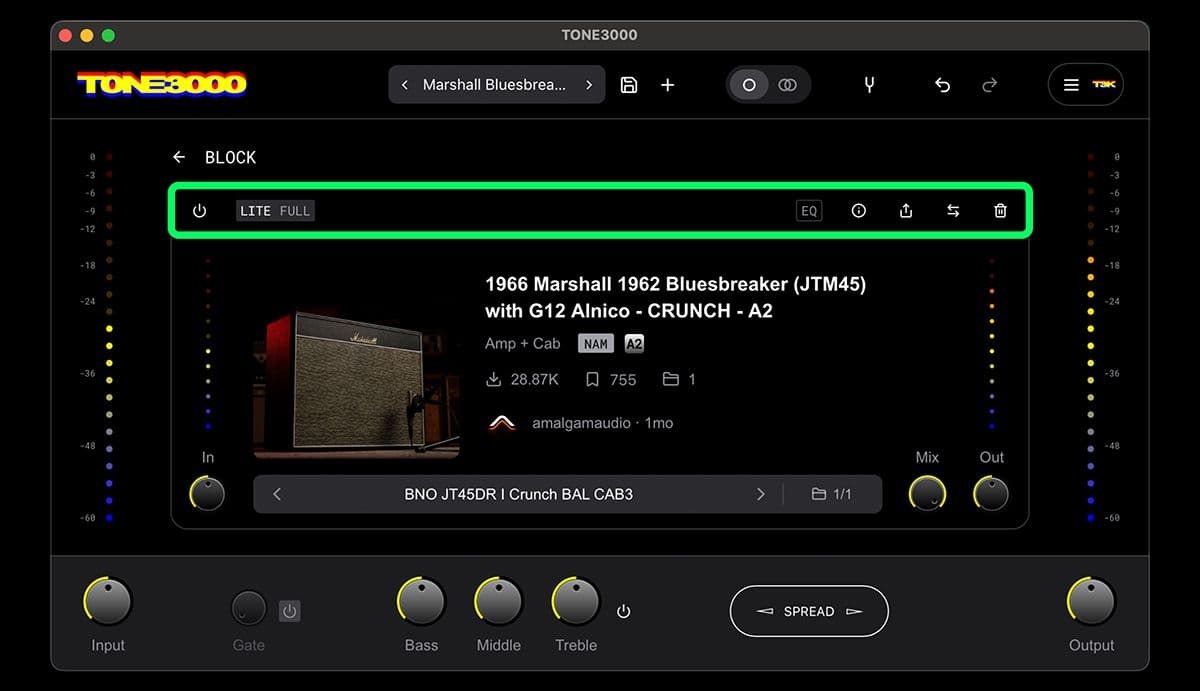
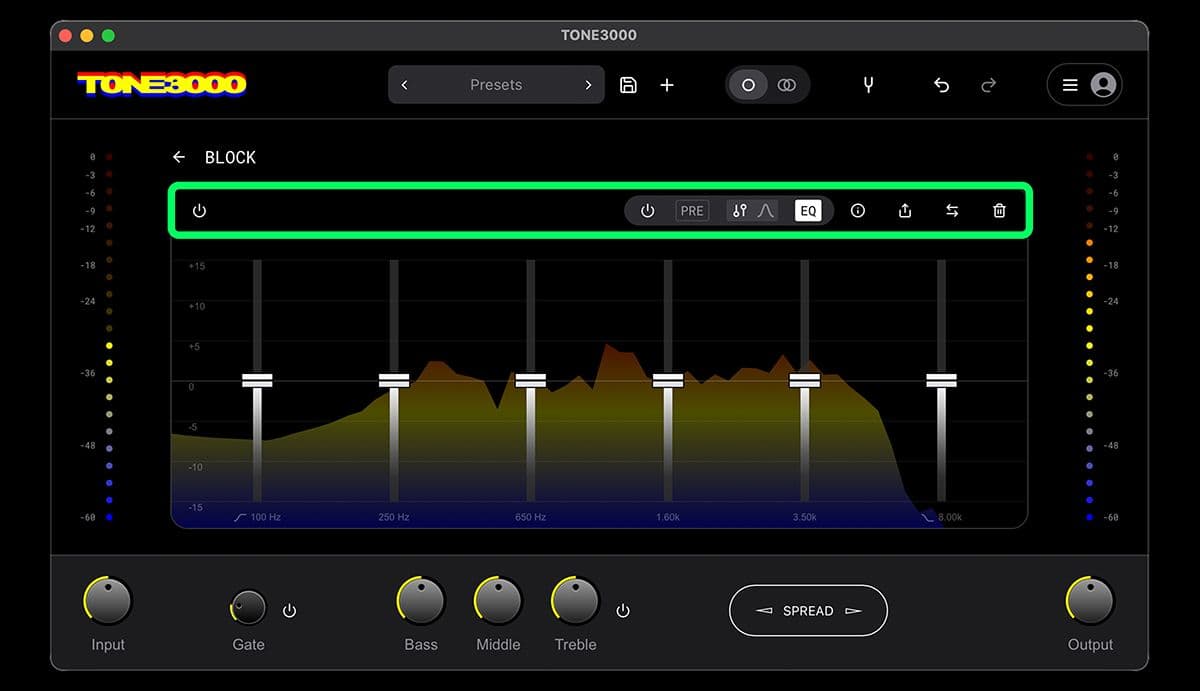
Click any block in the chain to open its controls.
- Model swaps between the captures in the loaded pack. Sign-in is required for TONE3000 tones; locally imported models switch without an account.
- In / Out set how much signal goes into the model and how much passes to the rest of the chain.
- Mix blends the wet (processed) signal against the dry (unprocessed) signal. Especially useful for reverbs and effects.
- EQ is a 6-band EQ with two views: Sliders for quick gain-only faders, and Curve for full parametric control of frequency, gain, and Q. Each band can be a Low Cut, Low Shelf, Bell, High Shelf, or High Cut, with up to ±15 dB of gain. Place it PRE (before the model) or post.
- Power bypasses the block without removing it.
- Swap replaces the tone in place. Remove deletes the block. Share copies a tone3000.com link for the tone.
- Normalize (when revealed in Settings) levels the block's loudness so volume stays consistent across the chain. See Normalization.
- NAM Size sets an individual block to LITE or FULL, without affecting other blocks. See NAM A2 Size.
- Info shows the tone's description, gear makes, and tags from TONE3000.
- Favorite saves the tone to your TONE3000 favorites without leaving the plugin. View on TONE3000 opens the tone in your browser.
Pro tip: Right-click a block to Copy, then right-click an empty + slot to paste a full duplicate including tone, model, and settings. Hold ⌥/Alt while dragging a block to duplicate it in place.
Mono vs Stereo
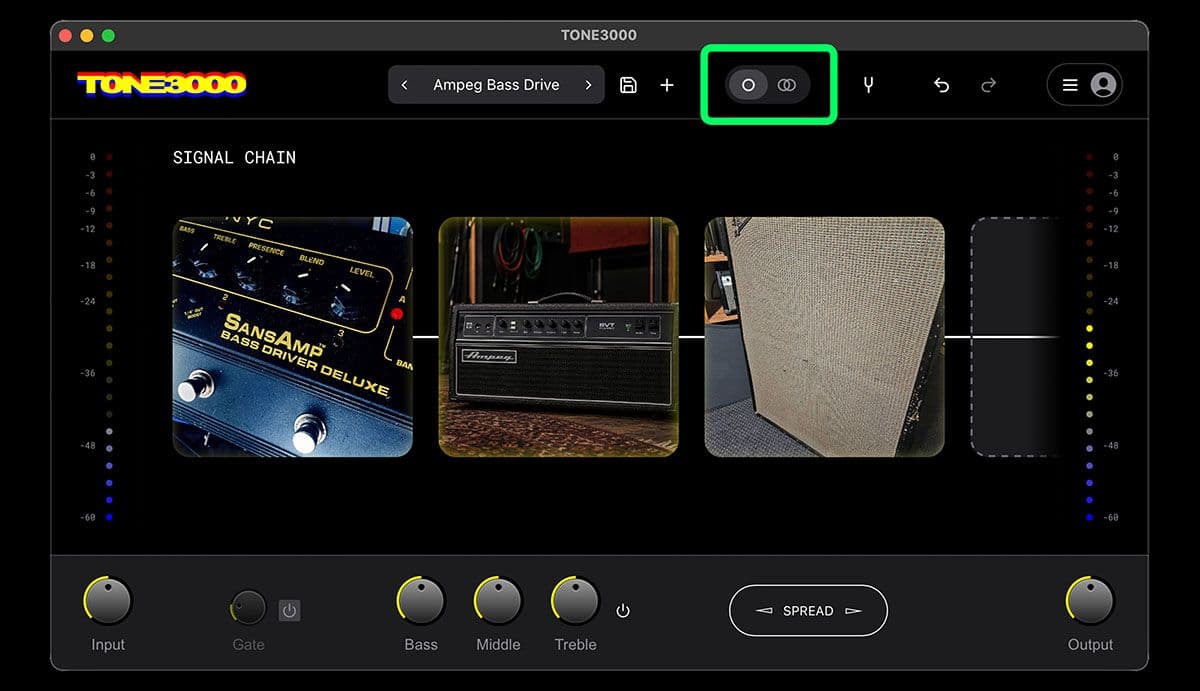
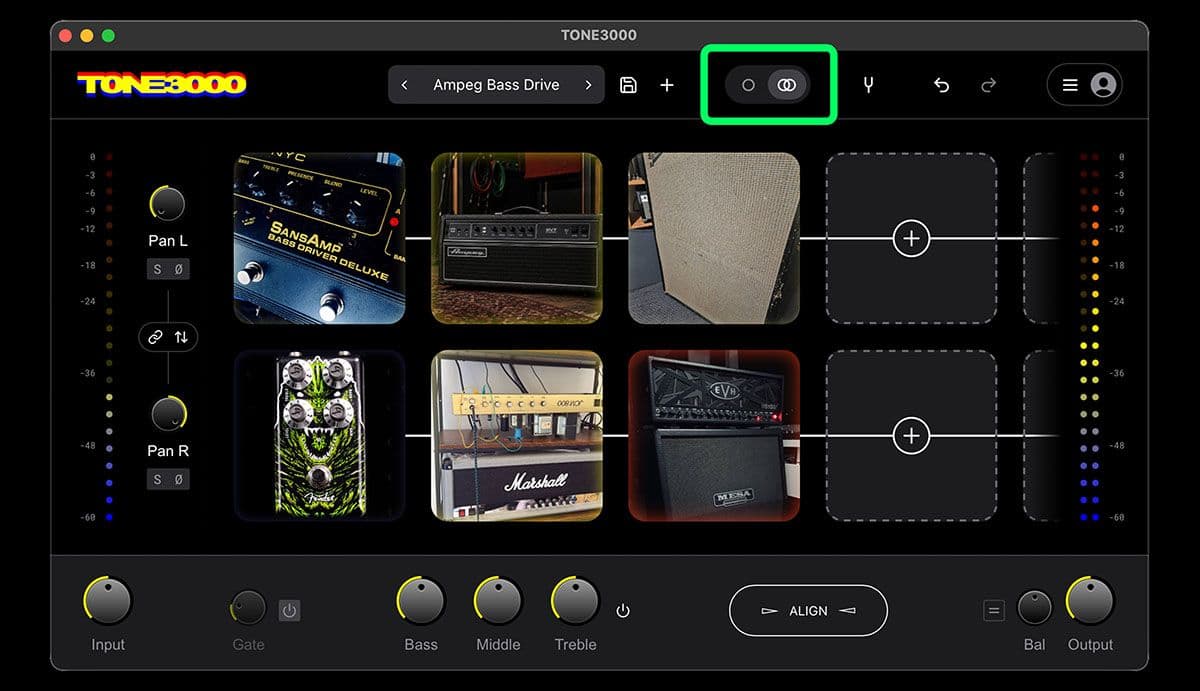
Use the Mono / Stereo control in the header:
- Mono: one chain, both outputs. Spread and Dual Mono are available here.
- Stereo: independent Left and Right chains, with pan, solo, swap, polarity invert, branch, Align, and Balance.
Full details in Stereo, Spread, and Align below.
Presets
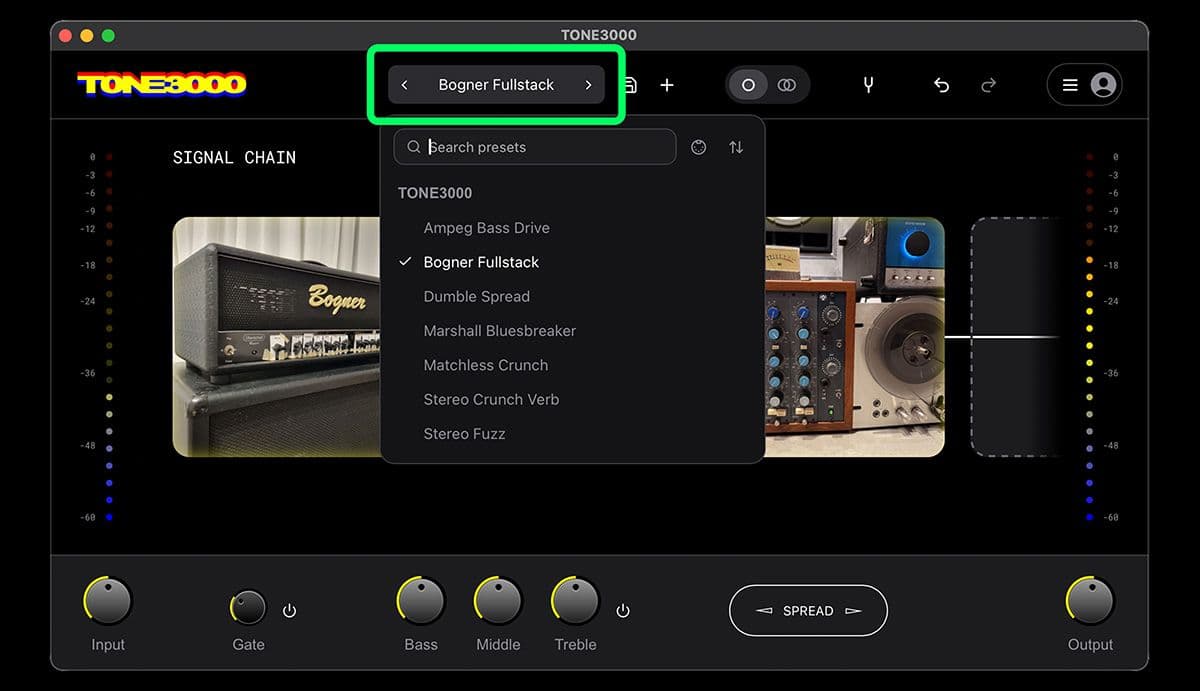
Load: click the preset name to open a factory or user preset. The arrows in the preset bar scroll through them. The browser lists your presets and the TONE3000 factory presets separately, with a search box for finding one by name.
Save: click the save icon. A preset stores the whole rig, including chains, block settings, and master controls. Saving with the same name overwrites; a new name creates a new preset. Factory presets are read-only.
Reorder: click the up/down arrows icon in the preset browser, then drag user presets into a custom order. The Prev/Next arrows and MIDI preset changes follow it. To tweak a factory preset, save a copy under a new name.
Rename and Delete are available on your own presets, and New (+ icon) clears the chain and resets every control to its default, which is the fastest way to start a new signal chain from scratch.
In your DAW: your presets also appear in your DAW's own preset (program) list, so you can switch them from the host or with MIDI. See Switching presets with MIDI.
Sharing presets
Every preset you save is a single .t3kpreset file. It carries the whole rig, including the model data for every block, so the person you send it to can load it right away, even offline.
To open your presets folder, go to Settings → Plugin Settings → Presets → Open presets folder, or find it here:
| Platform | Folder |
|---|---|
| Windows | Paste %APPDATA%\TONE3000\Presets into File Explorer's address bar |
| Mac | In Finder, choose Go → Go to Folder, then paste ~/Library/Application Support/TONE3000/Presets |
| Linux | ~/.config/TONE3000/Presets |
To send a preset:
- Save the preset in the plugin.
- Open your presets folder and find the .t3kpreset file named after your preset.
- Send that file. A full rig can be large, so a cloud link (Google Drive, Dropbox, and so on) is more reliable than email, which sometimes strips or cuts off attachments. The plugin ignores a damaged file, so it simply won't appear.
To add a preset someone sent you:
- Copy the file into your presets folder (same locations as above). Put it directly in Presets, not in Factory or any subfolder, and keep the .t3kpreset extension. On Windows, turn on File name extensions in File Explorer so it doesn't end up as .t3kpreset.txt.
- Close and reopen the plugin window (or the standalone app). The plugin reads the preset list when its window opens, so a file you copy in while it's open won't show until then.
- Find it under Your Presets in the preset browser.
Stereo, Spread, and Align
These features are each tied to a mode: dual chains and Align live in Stereo, while Spread and Dual Mono live in Mono.
Dual chains
Switching to Stereo mode gives you two independent chains, Left and Right:
- Pan L / Pan R place each chain in the stereo field. Link the pans to mirror them.
- Solo L / Solo R isolate one chain.
- Invert L / Invert R flip one chain's polarity, which fixes chains that hollow out or cancel.
- Swap Chains exchanges Left and Right, pans included.
- Branch feeds the other chain from a point in this one. Click a branch gap between blocks to create it, and click the junction again to make the chains independent.
Common setups: the same Amp + Cab on both sides with different IRs or EQ for wide rhythm guitar; a pedal on Left only branching into a shared amp; two different amps hard-panned for a double-tracked feel.
Dual Mono (stereo input, one chain)
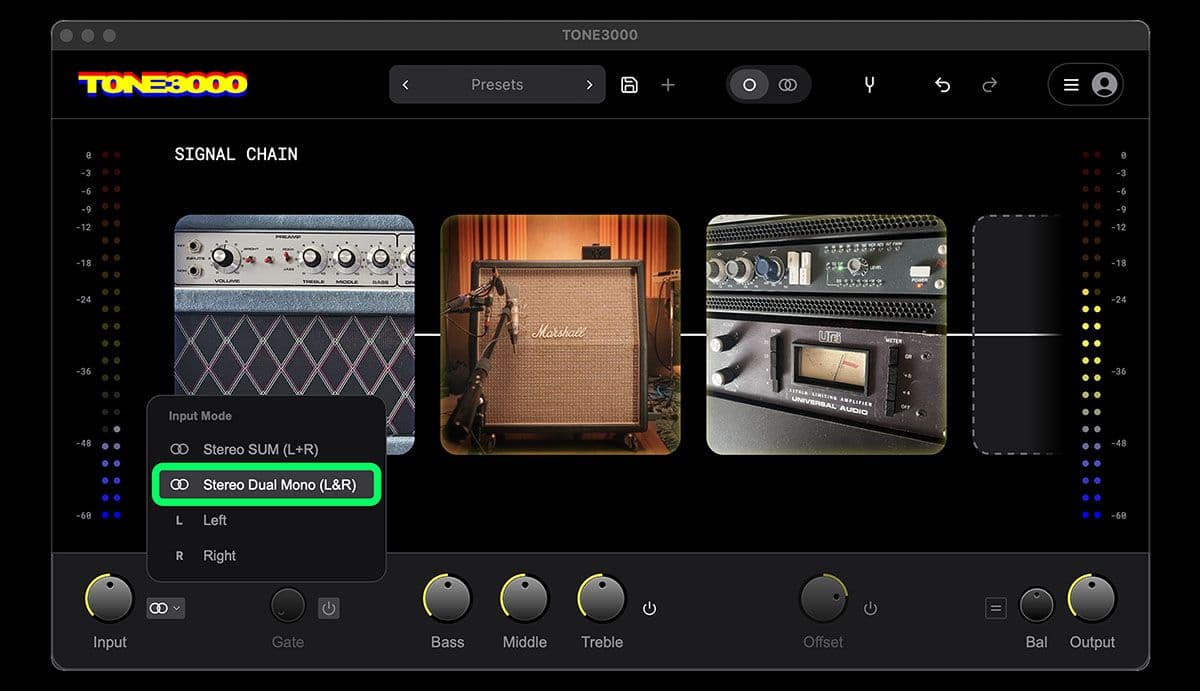
Dual Mono runs a stereo source, like double-tracked guitars or a stereo instrument, through one mono chain while keeping Left and Right separate. Each side gets its own copy of the chain with identical settings, so you can dial in one sound without managing two chains.
To turn it on, stay in Mono mode, open the Input Mode menu on the bottom panel, and choose Stereo Dual Mono (L&R). It uses twice the CPU (spread across cores with Multi-Core Processing), and Spread is off while it's active, since the chain already outputs two real channels.
Spread (mono to stereo width)
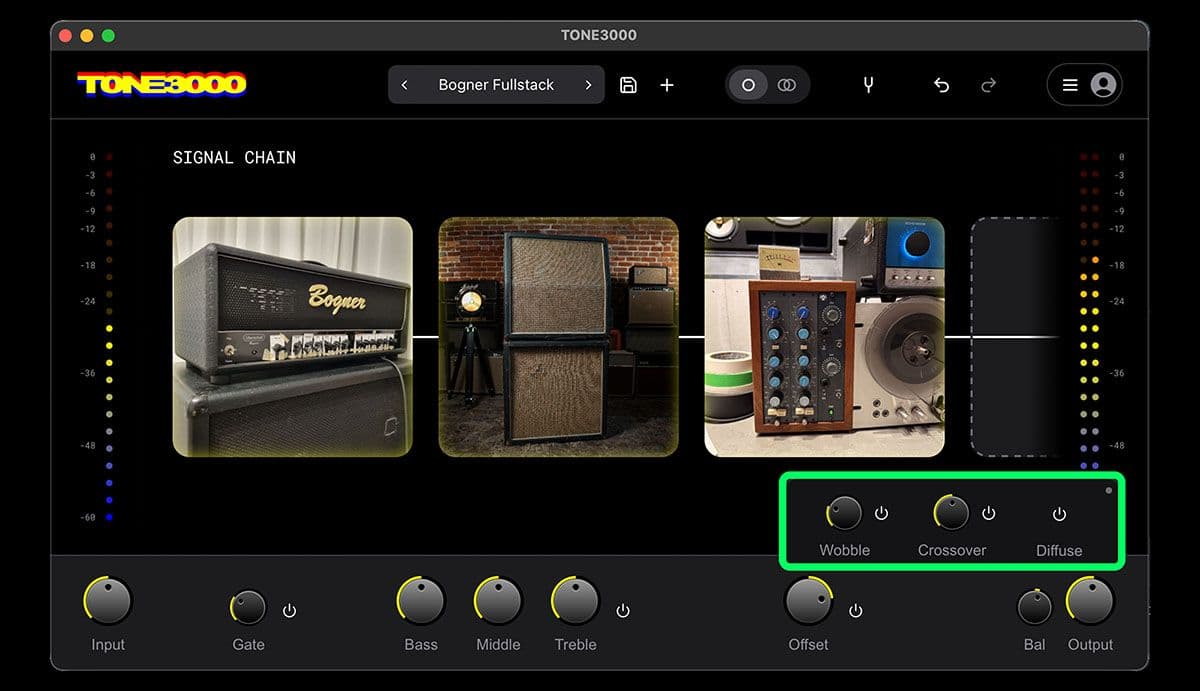
Spread is a stereo doubler for a mono chain. One side is your unaltered performance, the other is a slightly late, subtly drifting copy, more like a second take than a static delay.
- Stay in Mono mode.
- Enable Spread on the faceplate.
- Turn Offset left or right, up to ±24 ms. The direction picks which side lags; the amount sets the delay.
- Right-click Offset for the advanced panel: Wobble adds humanizing drift (up to ±1.2 ms), Crossover keeps lows dual-mono below its cutoff (33 to 520 Hz, default 130 Hz), Diffuse phase-decorrelates the lagged side, and a correlation light flags mono-compatibility (dim is safe, yellow is caution, red means cancellation on a mono sum).
By default, lows stay dual-mono to protect mono compatibility and keep things from going thin and phasey; turn Crossover off to double the full band and trade that safety for maximum width. There's no wet/dry mix; when Spread is on, Offset is the main musical control.
Beginner tip: A small Offset plus a little Wobble gives natural width. Watch the mono-safety light if the mix will be folded to mono.
Align (stereo time correction)
Use Align in Stereo mode when Left and Right aren't time-aligned, which happens with different IR lengths, mic distances, or processing delay.
- Enable Align.
- Nudge Offset toward L or R (up to ±24 ms), or click Auto Align: the plugin mutes the output for about half a second, runs an internal sweep through both chains, and dials in the correction automatically, fixing inverted polarity along the way.
- Use Auto Balance if the two chains also differ in level.
Align has the same advanced panel as Spread (Wobble, Crossover, Diffuse, and the correlation light), with every section off by default, so Align stays purely corrective until you ask for the deck.
Align is corrective and Spread is creative. Each belongs to its own mode, so you'll never see both at once.
Advanced
Normalization
Every NAM capture loads with normalization enabled. It levels each block's output so volume stays consistent across the blocks in your chain, no matter how loud or quiet the original capture was.
Normalization is controlled per block. Turn on Per-Block Normalization in Settings → Plugin Settings to reveal an optional control on each block: look for the = icon, enabled by default. Turn it off on a block when you want that capture's true output level.
For how normalization interacts with calibration, see Calibration and Gain Staging.
Calibration and Gain Staging
NAM captures are recorded at a known input level. Calibration matches your interface or DAW level to that reference so the model responds the way the capture intended. This matters most for amp feel and how hard the virtual tubes or transistors get hit.
To enable: go to Settings → Plugin Settings, turn on Calibration, and enter the dBu level that matches your DAW's maximum digital level. Typical values are +12 dBu for pro gear and +4 dBu for semi-pro. Your calibration setting is remembered on this computer, so every new instance of the plugin starts with it.
Captures that ship with calibration data show a gauge icon on their block and use that data by default.
Normalize vs. Calibration:
| Setting | What it does |
|---|---|
| Normalize | Loudness leveling so blocks sit at consistent volume. On by default per block; Settings can reveal a per-block off switch. |
| Calibration | Absolute gain staging against the capture's recording level. |
When calibration is actively passing true output level to the next NAM block, Normalize may show as overridden. That's intentional.
Beginner tip: Leave Normalize on and skip calibration until you care about matching a specific capture's feel.
Pro tip: Calibrate once for your interface, keep Amp Heads un-cab'd consistent across sessions, and use block In/Out for musical gain staging.
NAM A2 Size
TONE3000 loads NAM Architecture 2 (A2) models only, in two sizes:
- A2-Lite is best for tracking, big sessions, and laptops where CPU is tight. It still sounds amazing.
- A2-Full is the maximum accuracy model which is great for final tones, and critical listening.
By default, every block loads at A2-Lite, which sounds great for most applications. Each block carries its own size, so you can mix LITE and FULL blocks in the same chain.
Load new blocks as A2-Lite or A2-Full
Go to Settings → Plugin Settings → NAM A2 Size and choose A2-Lite or A2-Full. Every tone you add from then on loads at that size. Blocks already in your chain keep the size they have, so presets load exactly as you saved them.
Set the NAM size on each block
- Go to Settings → Plugin Settings and turn on Per-Block NAM Size.
- A LITE / FULL toggle appears on every NAM block, next to its power button.
- Click LITE or FULL on a block to change that block only. Watch the CPU readout in the info bar as you switch.
With Per-Block NAM Size turned off, a block shows its size only when it differs from your default.
Learn more: NAM A2: The Complete Guide
Oversampling
Nonlinear amp models create harmonics. Without enough headroom above the sample rate, those harmonics alias back into the audible band.
Turn on Settings → Plugin Settings → Oversampling to run the tone chain at a higher internal rate, then filter back down:
| Rate | Notes |
|---|---|
| 2× | Default when enabled, with a solid quality / CPU balance |
| 4× | Cleaner on very saturated tones |
| 8× | Maximum anti-aliasing; heaviest CPU |
Higher rates improve quality but use more CPU, so toggle oversampling off if you need headroom. There is no filter setting to choose: the anti-aliasing filter is fixed, and it was chosen specifically so that turning oversampling on or off never shifts your timing. Like calibration, your oversampling setting is remembered on this computer for every new instance.
Multi-Core Processing
Multi-Core Processing (on by default, and machine-wide) spreads the heavy lifting across CPU cores: in Stereo mode the Left and Right chains process in parallel, and oversampled NAM models split their work across cores in any mode. The sound is identical, but you get more headroom on heavy rigs. Turn it off only if you hit machine quirks.
Heavy-Session Checklist
- Run the host or standalone session at 48 kHz
- Start on A2-Lite and bump to Full when printing
- Stay at 2× oversampling unless you hear aliasing on high-gain tones
- Leave Multi-Core Processing on, especially for stereo rigs and oversampled models
- Bypass unused blocks instead of leaving silent high-CPU models online
MIDI Control
Map pedals and knobs to plugin controls in Settings → Plugin Settings → MIDI Mapping. Mappings save with the plugin and work in your DAW, which is useful for stomps that toggle block power, change presets, or move faceplate knobs. Enable your devices under System Settings → MIDI Inputs, including Bluetooth MIDI.
Mapping a control
- Open Settings → Plugin Settings → MIDI Mapping and choose a control from the list.
- Move the knob or press the footswitch you want to use. The plugin listens for about ten seconds and maps whatever it hears.
- You can also type a CC number directly instead of moving hardware.
- Each mapped row has buttons to re-learn it on different hardware or remove it.
Set MIDI Channel in the same panel. It defaults to Omni, which listens on every channel.
Switching presets with MIDI
Map Previous Preset and Next Preset to two footswitches to step through your presets in order.
Program Change (PC) messages also load presets directly, with no mapping needed. PC numbers start at 0: PC 0 loads the first preset in the list, PC 1 the second, and so on up to PC 127. Your own presets come first, followed by the factory presets. Each preset's number comes from its position, so dragging presets into your own order sets the PC map to match. Click the MIDI icon in the preset browser to show each preset's PC number. Program changes follow the MIDI Channel setting too.
Note: Many DAWs, including Cubase, number program changes 1 to 128. If yours does, subtract one: program 1 in your DAW loads PC 0 in TONE3000.
Automating in your DAW
Preset changes: to switch presets at exact points in a song, create a MIDI track, set its MIDI output to TONE3000, and draw Program Change events wherever the tone should change. The same PC number loads the same preset in every plugin format.
Control automation: TONE3000's master controls show up as automation parameters in your DAW, including Input and Output level, the Noise Gate and Pitch Shift controls, Tone Stack power and Bass/Mid/Treble, Output Balance, the Spread and Align controls, and Stereo pan, solo, and invert. Open your track's automation lanes, pick a TONE3000 parameter, and draw in your changes, like turning the gate on for a heavy chorus or bending the pitch for a whammy dive.
Block power isn't a DAW automation parameter. To switch blocks on and off during a song, map them to MIDI or save each variation as its own preset.
Pro tip: For live sets, put one MIDI track of program changes under each song and add automation lanes for gate and level moves in between. Your tone changes happen on their own, so you can focus on playing.
What you can map
- Presets: Previous and Next.
- Global: Input Gain, Output Level, Output Balance.
- Noise Gate: power, threshold, release, hold, and range.
- Pitch Shift: power, pitch, STEP, and tonality.
- Tone Stack: power, Bass, Mid, Treble.
- Stereo: Stereo Mode, Pan L and R, Solo L and R, Invert L and R.
- Spread and Align: power, offset, wobble, crossover, and diffuse for each.
- Blocks: power for every block slot in the chain.
Reference
Settings and Controls Reference
Main controls (always visible)
| Control | What it does |
|---|---|
| Knobs | Drag to set, Shift-drag for fine control, double-click to type a value, ⌥/Alt-click to reset. |
| Presets bar | Load, save, and edit presets. |
| Tuner | Opens the built-in chromatic tuner. |
| Undo / Redo | Covers chain edits (add, remove, reorder, swap) and many parameter changes. Use freely while experimenting. |
| Mono / Stereo | Switches input mode. |
| Input Mode | How a stereo input feeds the chain. In Mono: Stereo SUM (L+R), Stereo Dual Mono (L&R), Left, or Right. In Stereo: Stereo (one channel per chain), Left, or Right. |
| Account / Settings | Sign in, sign out, and plugin settings. |
| Input | Input chain level, ±24 dB. Watch the meters and click a lit clip light to clear it. |
| Gate | Noise gate on/off with a threshold from -100 to 0 dB. Right-click for Release, Hold, and Range. |
| Pitch Shift | Transposes the input up to ±24 semitones, or sweeps it like a whammy with STEP off. Right-click for STEP, Tonality, and Buffer. Shown when Show Pitch Shift is on in Settings. |
| Equalizer | Bass, Middle, Treble tone stack (0 to 10). Power off to bypass without losing settings. |
| Spread | Stereo widening. Offset sets the delay between left and right. |
| Align | Stereo mode: corrective time alignment between the Left and Right chains. |
| Balance | Level trim between chains (±12 dB), in Stereo mode or Mono with Spread on. Auto Balance matches levels after ~2 s of playing. |
| Output | Output chain level, ±24 dB. |
| Info bar | Shows hover tips for whatever your pointer is over, plus the CPU meter. Toggle in Settings → Plugin Settings → Show Info Bar. |
System Settings
System Settings appears in the standalone app only. In a DAW, the host owns devices, buffer size, and sample rate, so Settings opens straight to Plugin Settings.
| Setting | Notes |
|---|---|
| Hear Yourself | Turns on monitoring. |
| Audio Driver | Choose which audio system drives your devices. On Windows, ASIO gives the lowest latency. |
| Input Device / Input Channel | Select your interface, then play and pick the channel with signal (Mono) or two channels (Stereo). |
| Output Device | Select your output. |
| Buffer Size | 128 samples recommended. Higher adds latency; lower can cause crackles. |
| Sample Rate | 48 kHz recommended. |
| Driver Settings | Opens your ASIO driver's control panel for buffer and clock options, or resets the device. |
| MIDI Inputs / Bluetooth MIDI | Enable connected MIDI devices. |
Plugin Settings
| Setting | Notes |
|---|---|
| Show Info Bar | Show or hide the info bar. |
| Show Gate | Show or hide the Gate on the faceplate. On by default. |
| Show Pitch Shift | Show or hide Pitch Shift on the faceplate. Off by default. |
| NAM A2 Size | Size for newly added NAM blocks, A2-Lite by default. Existing blocks keep their own. |
| Per-Block NAM Size | Adds a LITE / FULL toggle to every NAM block. |
| Per-Block Normalization | Reveals per-block Normalize toggles. |
| Calibration | Turn on and set the input dBu level. Remembered on this computer for new instances. |
| Oversampling | Turn on and choose 2×, 4×, or 8×. Remembered on this computer for new instances. |
| Multi-Core Processing | Parallel processing across CPU cores. |
| MIDI Mapping / MIDI Channel | Map controls and set the channel. |
| Presets | Opens your presets folder for backing up or sharing presets. |
| Diagnostics | Copy logs to the clipboard, or reveal the log file on disk, for bug reports. |
| Version and updates | Shows the running version, with an update button when a newer build is available. To update, see Updating the Plugin. |
Quick Fixes
| Goal | Do this |
|---|---|
| Update to the latest version | Download the installer at tone3000.com/plugin/download, run it, then open the plugin. Your presets are preserved. |
| Add a tone | Click +, then search or pick from Trending |
| Load a file from your computer | Right-click a tile, then Load File or Load Folder (or drag files onto the chain) |
| Swap a tone | Open the block, then Swap |
| Build amp and cab | Load an Amp Head, then add a Cabinet IR |
| Widen a mono rig | Enable Spread, set Offset (right-click for Wobble) |
| Fix L/R timing | Stereo mode, then Align or Auto Align |
| Match L/R levels | Auto Balance |
| Run dual amps | Stereo mode, build Left and Right, or use Branch |
| Run a stereo source through one chain | Mono mode, then Input Mode → Stereo Dual Mono (L&R) |
| Transpose without retuning | Turn on Show Pitch Shift in Settings, power on Pitch Shift, and set the Pitch knob |
| Can't find Pitch Shift | It's hidden by default. Turn on Show Pitch Shift in Settings → Plugin Settings |
| Tighten the noise gate | Right-click Gate and shorten Release |
| Use less CPU | A2-Lite, lower oversampling, 48 kHz, power off unused blocks |
| Get more fidelity | A2-Full plus higher oversampling |
| Match a capture's feel | Enable Calibration and set your interface dBu |
| Save a rig | Preset bar → Save |
| Start a new chain from scratch | Preset bar → New (+ icon) |
| Map a footswitch | Settings → MIDI Mapping |
| Switch presets from a pedal | Map Previous / Next Preset, or send program change messages |
| No signal at all | Check the cable, set the interface input to Inst / Hi-Z, turn up interface gain, confirm the right input channel is selected |
| Noticeable latency while playing | Lower buffer size to 128 samples; use ASIO on Windows |
| No sound (standalone) | Check System Settings devices and turn on Hear Yourself |
| Plugin missing in DAW | Rescan plug-ins or restart the DAW |
| Sign-in browser didn't open | Click Copy Link and paste it into your browser, or choose Sign in on a different device |
| Spread and pan are greyed out | The track or output is mono. Use a stereo track or output device. |
| A tone failed to load | Click Retry on the block |
| Change one block's quality | Turn on Per-Block NAM Size, then use the block's LITE / FULL toggle |
| Tune your instrument | Click the tuner in the header; click again to return to the chain |
Get Help
Report Issues or Submit Feedback on GitHub
Found a bug or have feedback? Please submit it as an issue on GitHub. This helps us collect the information needed to investigate and fix the issue. Click the green New issue button and follow the prompts: github.com/tone-3000/tone3000-plugin/issues
If you don't already have a GitHub account, you'll need to create one to submit an issue. This allows our team to follow up with any questions and lets you track the issue to see when it's resolved.
A good report helps us fix it fast:
- Search the existing issues first. If yours is already reported, add a comment with your details instead of opening a duplicate.
- Give it a specific title, like "Crackling audio in Reaper on Windows 11 at 128 samples".
- Include your setup: OS and version, DAW and plugin format (or standalone), audio interface, buffer size, and sample rate.
- Describe the steps to reproduce the problem, what you expected, and what happened instead.
- Attach logs: go to Settings → Plugin Settings → Diagnostics, copy the logs, and paste them into the issue.
Need Help Getting Started?
For setup questions and general help, the community is a great place to start. Join the TONE3000 Discord, the Neural Amp Modeler Facebook Group, or the Neural Amp Modeler subreddit. All three are active, and chances are someone has already solved what you're running into.
Email Support
For account issues or anything you'd rather not post publicly, email support@tone3000.com.
Thanks for being a part of the TONE3000 community.
Related Guides
Trending Tones




NEW TO TONE3000?
Discover hyper-realistic digital models of iconic gear, including the Fender Twin Reverb, Vox AC30, Marshall JCM 800, and thousands more. Getting started is easy—and free!